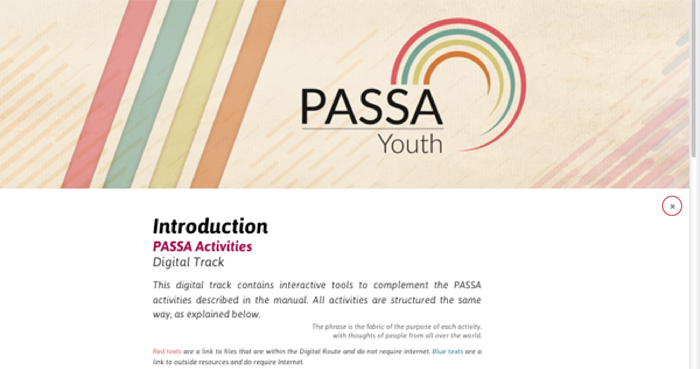
Introduction
PASSA Youth Activities
Digital Track
The phrase is a reflection related to the activity,
with thoughts of people from all over the world.
Concept
Main idea that can support the activity in a digital format.
 Offline Tools
In each activity you will find a tool that can be used on your computer without internet connection.
Name of the tool
Here is a description of the main features and screenshots of the tool.
There are three ways to go to the website of the tool:
- The name of the tool
- The phrase "Visit their website" in the description
- The banner or screenshots
Requirements
It indicates whether the tool has any specific requirements for operation. Compliance with these requirements is part of planning prior to the workshop.
Resources
Tool installers for various operating systems.
The application download icon ![]() indicates that the resource can be downloaded from the internet.
indicates that the resource can be downloaded from the internet.
Example
In some instances we offer an example of the activity. You can open it by clicking on the file icon ![]() or by selecting the file name.
or by selecting the file name.
Tutorial
You will find a "step-by-step" tutorial of the tool, showing the features and elements used the most in the activity.
Some activities use a template that can be opened by clicking the icon ![]() or the template filename.
or the template filename.
 Online Tools
In each activity you will find one or more tools that can be accesed if you have internet connection.
Name of the tool
A description of the main features and screenshots of the tool.
Navigation
To view the other activities you must:
- Scroll to the top of the page where you will find the illustration that identifies the activity. This can be done with the scroll bar or the home key.
- Click on the X on the right, directly below the illustration, to return to the main menu.
- In the main menu you can see all 8 activities, each with its illustration, number, name, icon and mantra. Additionally, you will find the download area where there is direct access to all PASSA Youth Materials in PDF format and to the recommended applications so you can install them.
- To go to an activity simply click on it.
 Copyright
Images, songs, videos and in general creative content found on the internet, are protected by laws that recognize the authors as creators of a literary, artistic or scientific piece, understanding the work as a tangible product of human talent. In order to be protected the work has to be original.
Terms of protection
All materials used in PASSA Youth projects should respect the terms of the works used to create them.

The works protected by Copyright need explicit permission from the author to be used or modified. Private: all rights reserved.

Works under Copyleft or Creative Commons licenses come by default with some authorized uses. Open: some rights reserved.

Works in Public Domain can be used or reproduced by anyone without any authorization or remuneration to the author but credit must always be given. Public: rights expired, have been forfeited or are not applicable.

 Activity 1
Historical Profile
Weaving memories
"History is a prophet looking back:
for and against what was, it announces what will be"
Eduardo Galeano
Timeline
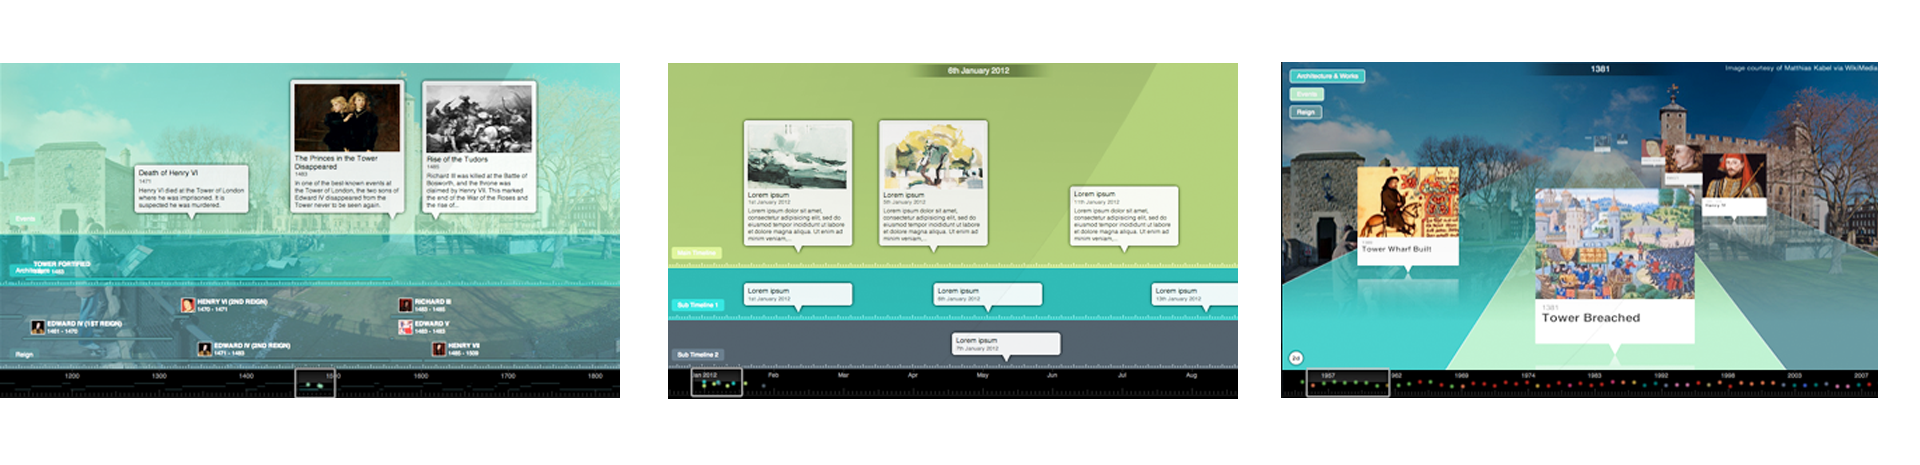
A timeline is a graphical display of a chronological sequence of events, that can be used to analyse the past, the present, and possible future trends. In the PASSA Youth manual are the steps to make a timeline with self-adhesive notes and illustrations. Here you will find several tools you can use to create digital timelines; some require an internet connection and some, like Scratch, run locally on your computer. There are templates to get you started, so youth can recreate the events they have identified, with the date on which they occurred, adding images, videos and a description.
Online Tools
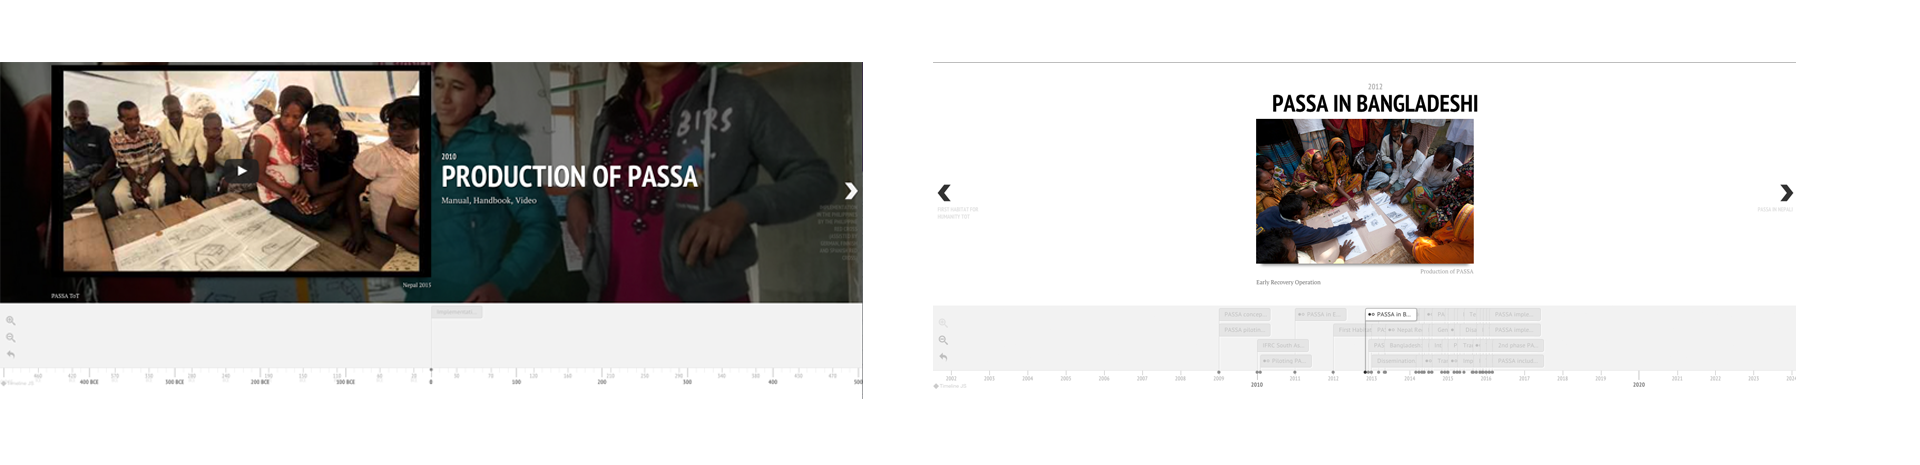
Knight Lab Timeline
Share your story or event through significant dates with their own texts, accompanied by audio, video and images. The Northwestern University Knight Lab is a team of technologists and journalists working at advancing news media innovation through exploration and experimentation. On their website you will find instructions on how to build your own timelines, for free, using a Google account to collect information on a Google Drive spreadsheet. Click on the image below to view a timeline of PASSA made with this tool. Visit the Knight Lab website for more details.
![]()
Copy the PASSA Youth Activity 1 - Historical Profile template into your Google account.
![]()
Copy the PASSA Group template into your Google account.
Look for additional online tools at the bottom of this page.
Offline Tool
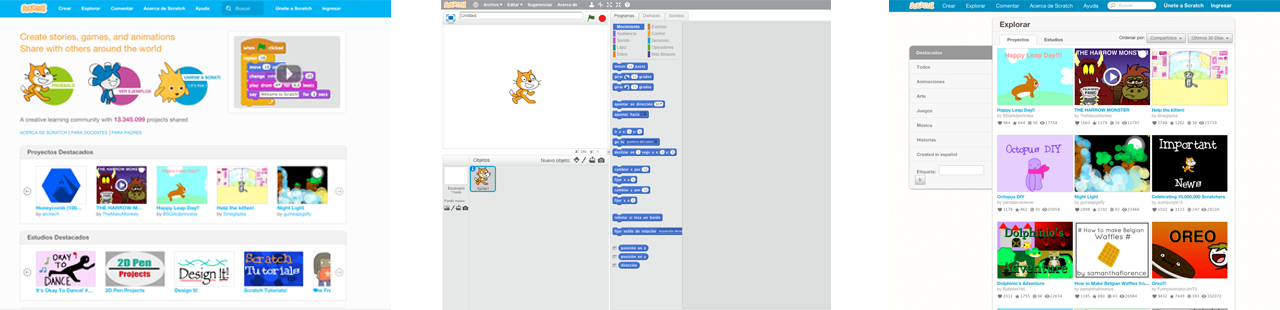
Scratch
Scratch is a tool to create digital interactive stories, animations and video games through a visual programming language that is easy to learn. It features an online community with people from all over the world and has been translated into more than 40 languages. It was designed by researchers at the MIT Media Lab for youth 8 to 16 years old but it's used by people of all ages! Scratch can also be used directly online if you have internet access. For more information visit their website. Scratch promotes creativity and collaborative work.
Requirements
For Scratch to work on your computer, first install Adobe Air.
Resources
Download the Scratch software for the operating system on your computer and install it.
![]()
Example
Open the historic profile example which consists of a timeline with 7 events, each with its own images and descriptions.
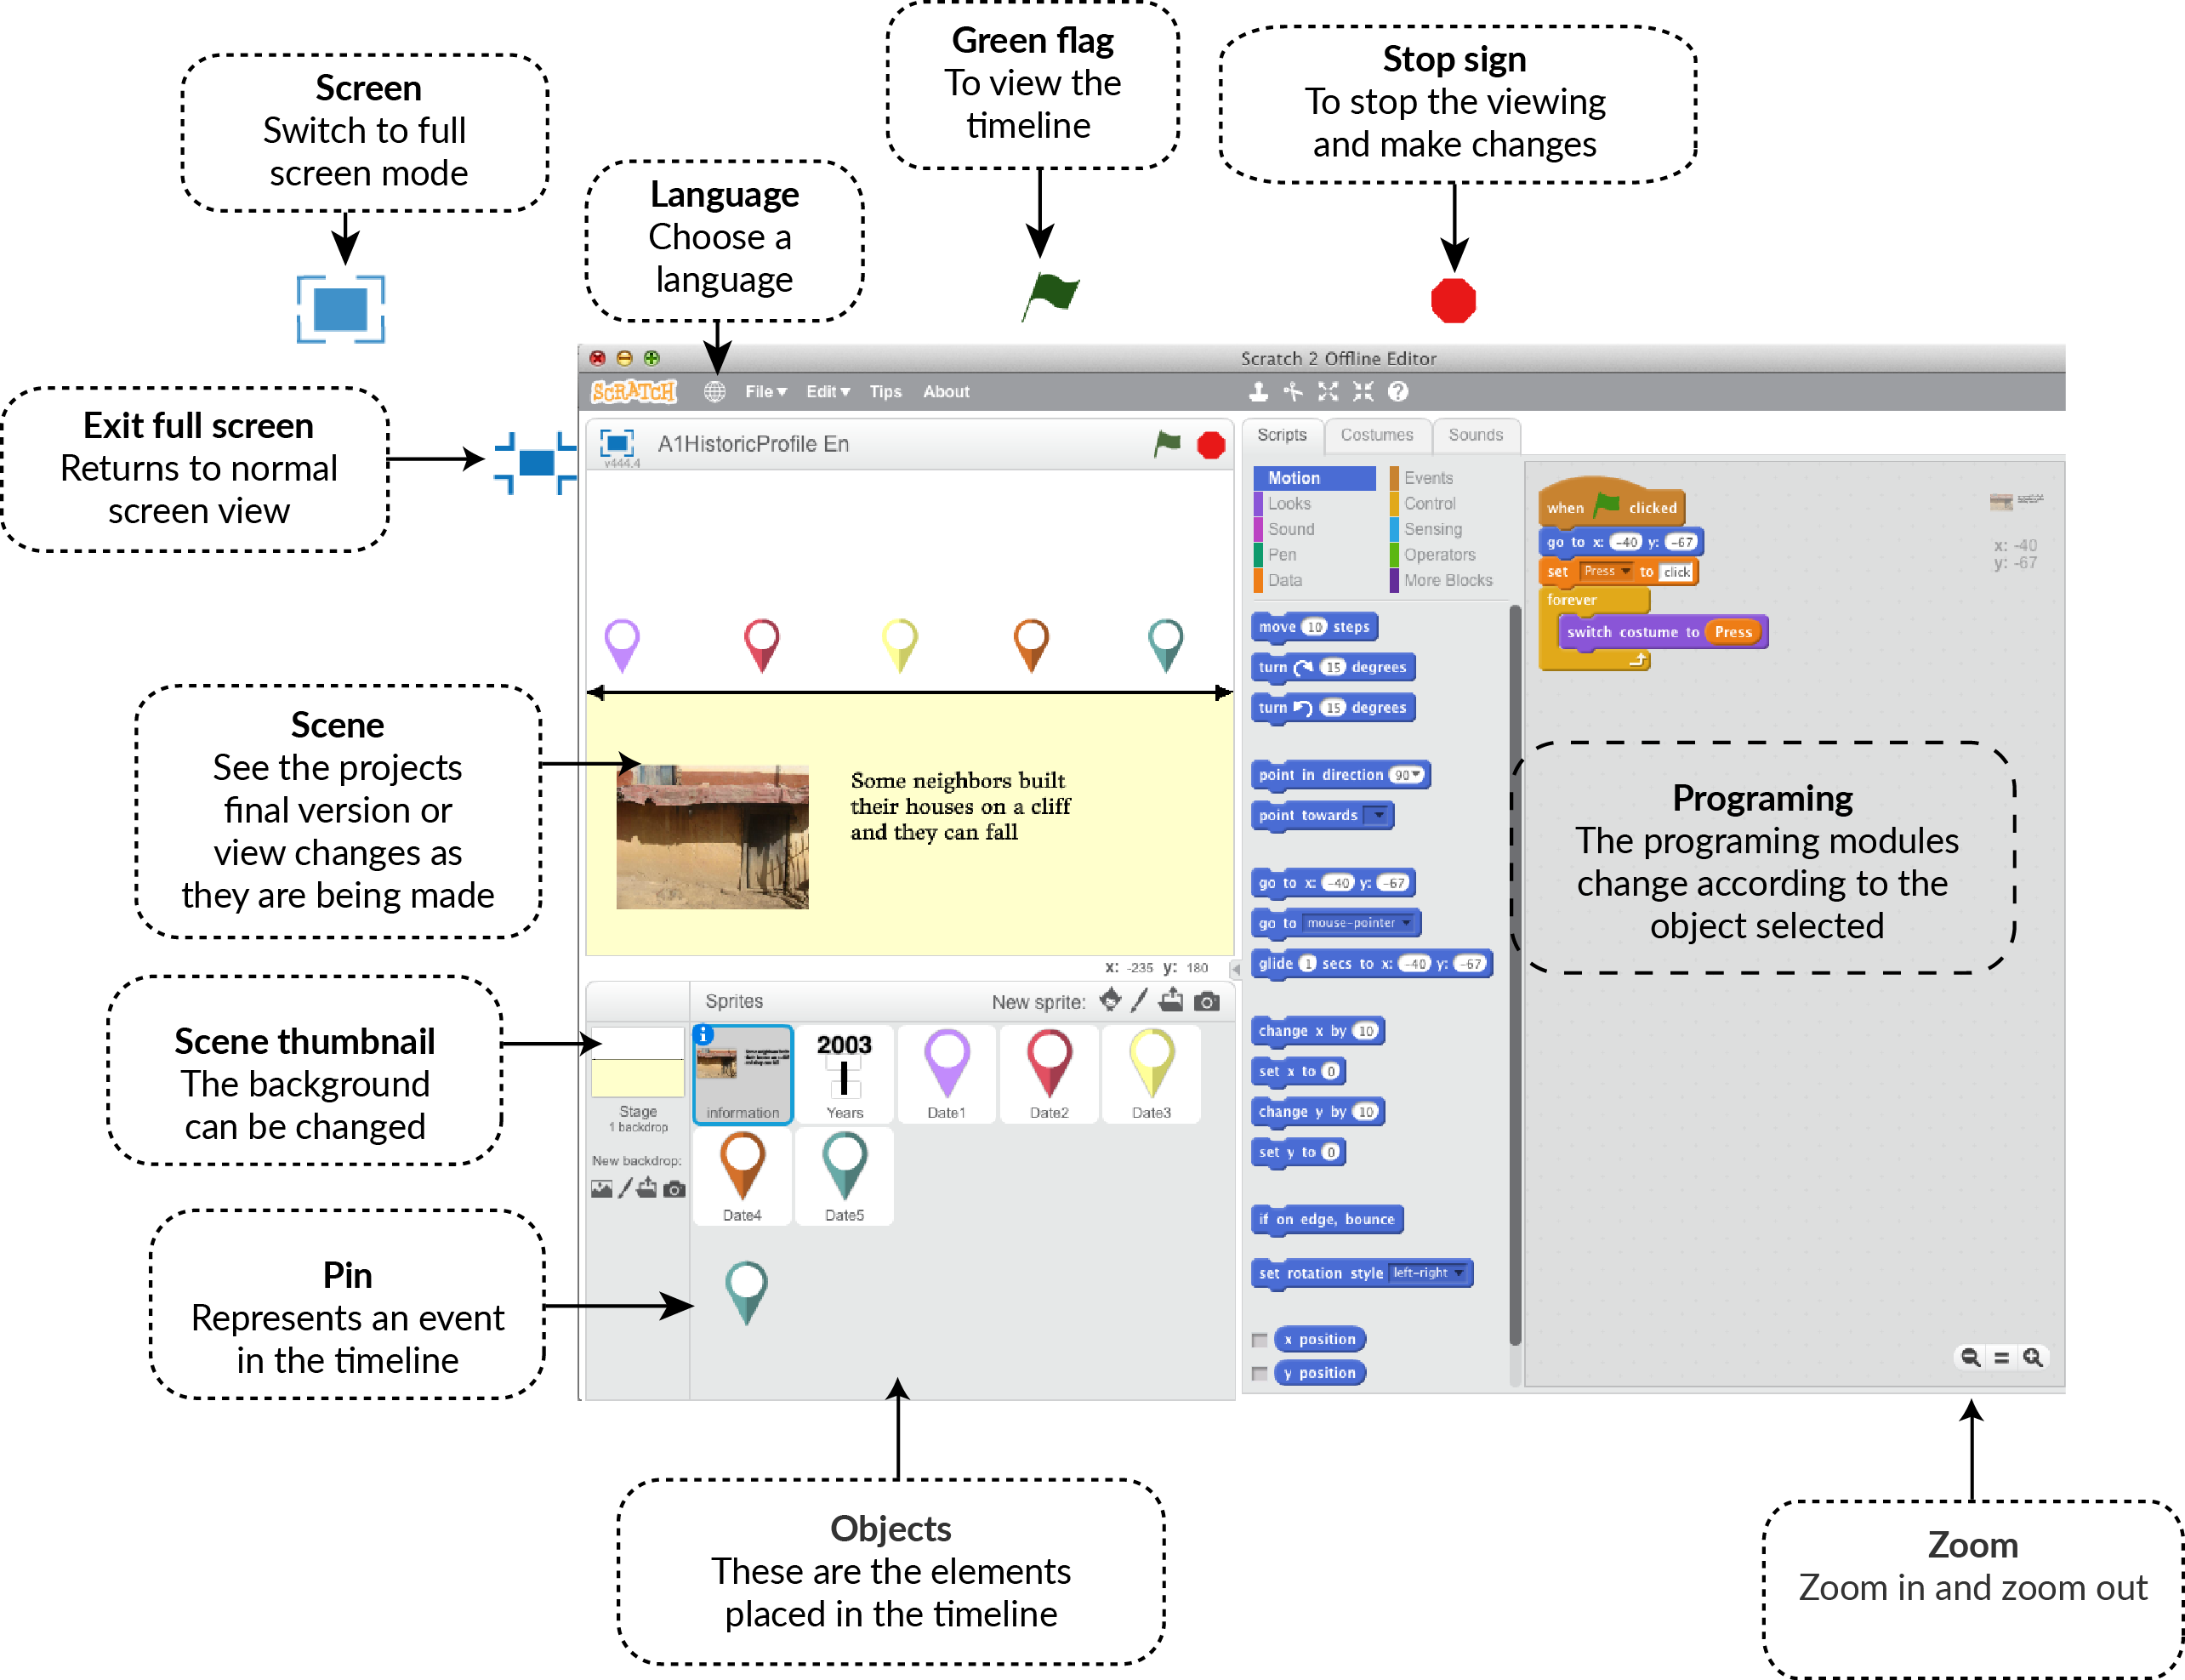
 Select full screen
 Click on the green flag to see it in action.
 Each pin is associated with an event in the timeline that has a color that represents its origin. Red for fire, yellow for air, orange for earth, blue for water, and violet for social phenomena.
 Click exit full screen.
![]()
Tutorial
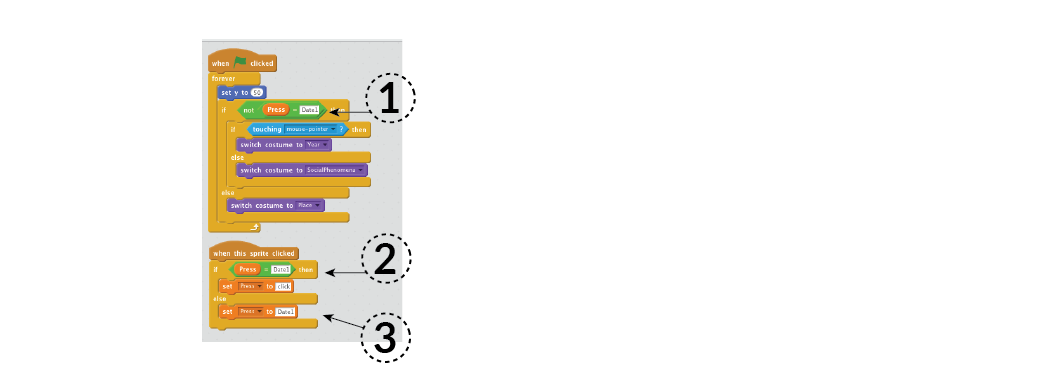
Open the the timeline template.
- Click on the green flag to see how it works.
- Each pin is associated with an event that can be placed on the timeline in the year that it happened, and has an image and a description attached to it.
- To stop viewing and modify the template, first click on the stop sign.

- After you make changes click on the green flag to test them.
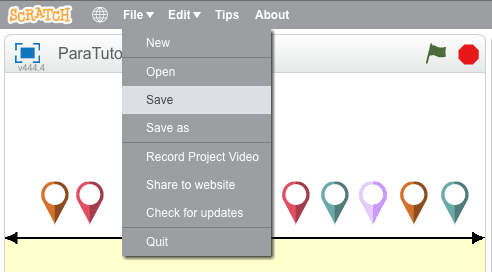
- To save your changes select File - Save.
Step 1 Count the number of events for each color in the timeline you want to digitize. Use pink or red to represent fire, yellow for air, orange for earth, blue for water, and violet for social phenomena.
Step 2 If you have more than one event per color, duplicate the corresponding pin until you have the amount you need.
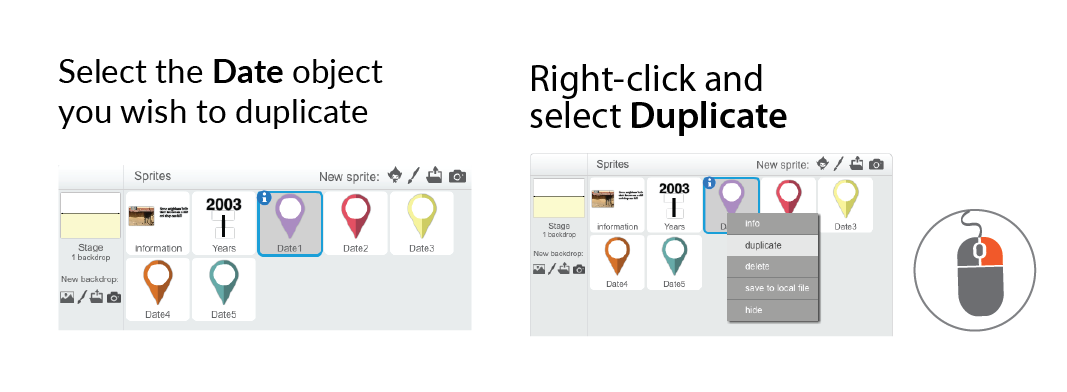
- When a duplicate is created, Scratch automatically generates a name, for example, date7; check that each pin has a different name.
- For each new pin replace the default name in these three areas for the new name.
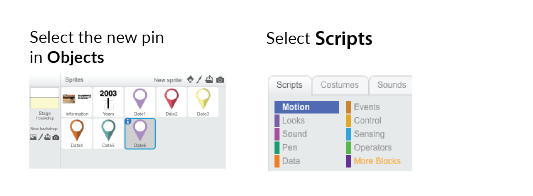
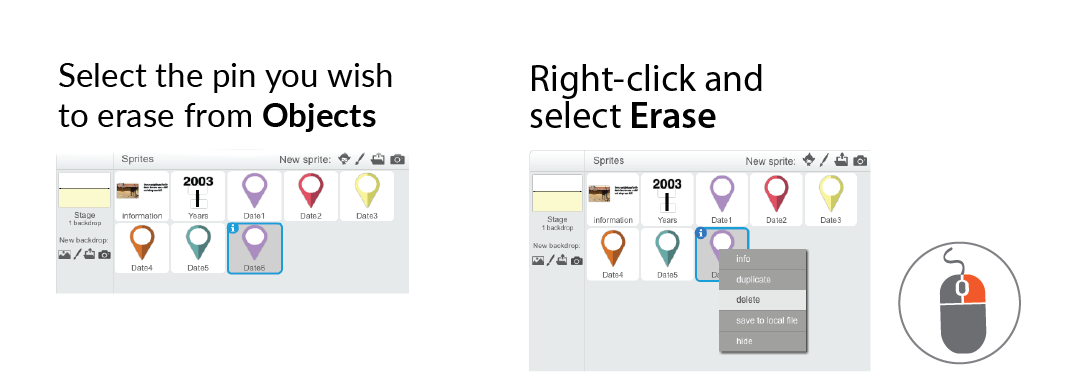
Step 3 Remove the pins that are not needed.
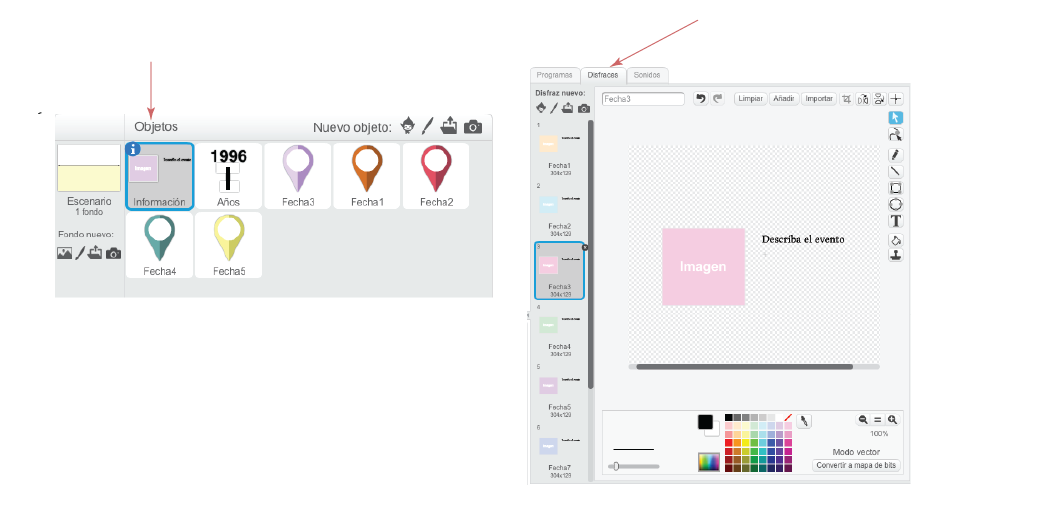
Step 4 Add the images and descriptions.
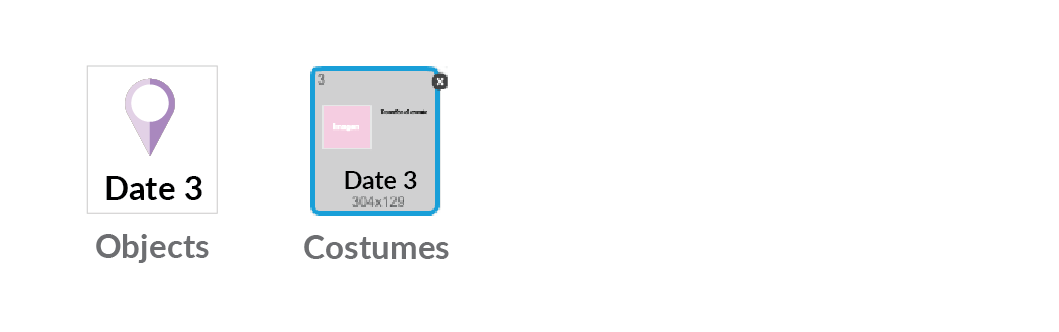
- In the first object, called Information you will find information of all events.
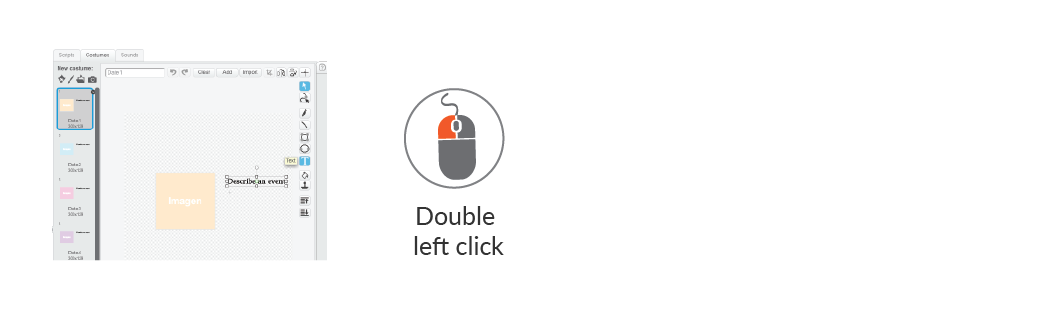
- Click on the Costumes tab to modify the information by drawing, writing or importing images.
- Select the number of the costume by the color and pin number to which you want to place information.
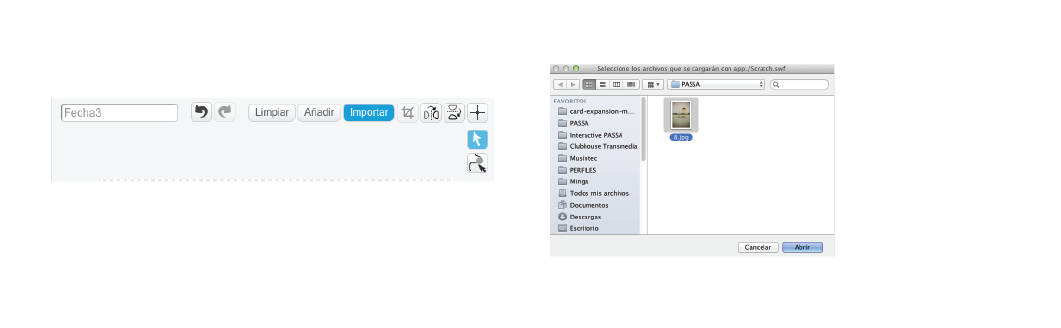
- If you want, you can add an image to your event.
- Describe the event with the Text tool.
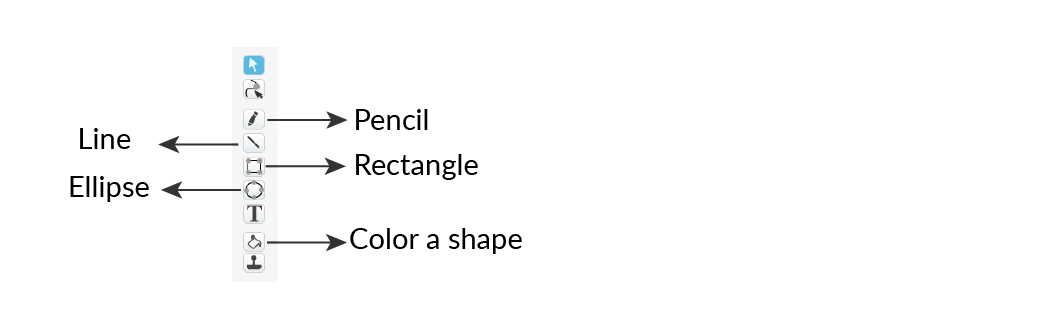
- To draw use the tools.
Step 5 Save your project.
If you want to learn more about Scratch view this guide and check out this tutorial.
Additional Online Tools
Tiki-Toki
It has two tools; one to create timelines for web and the other to create desktop timelines that run locally on the computer (without internet connection). Tiki-Toki offers a free version with limited functionality and a paid licensed version. For more information visit their website.
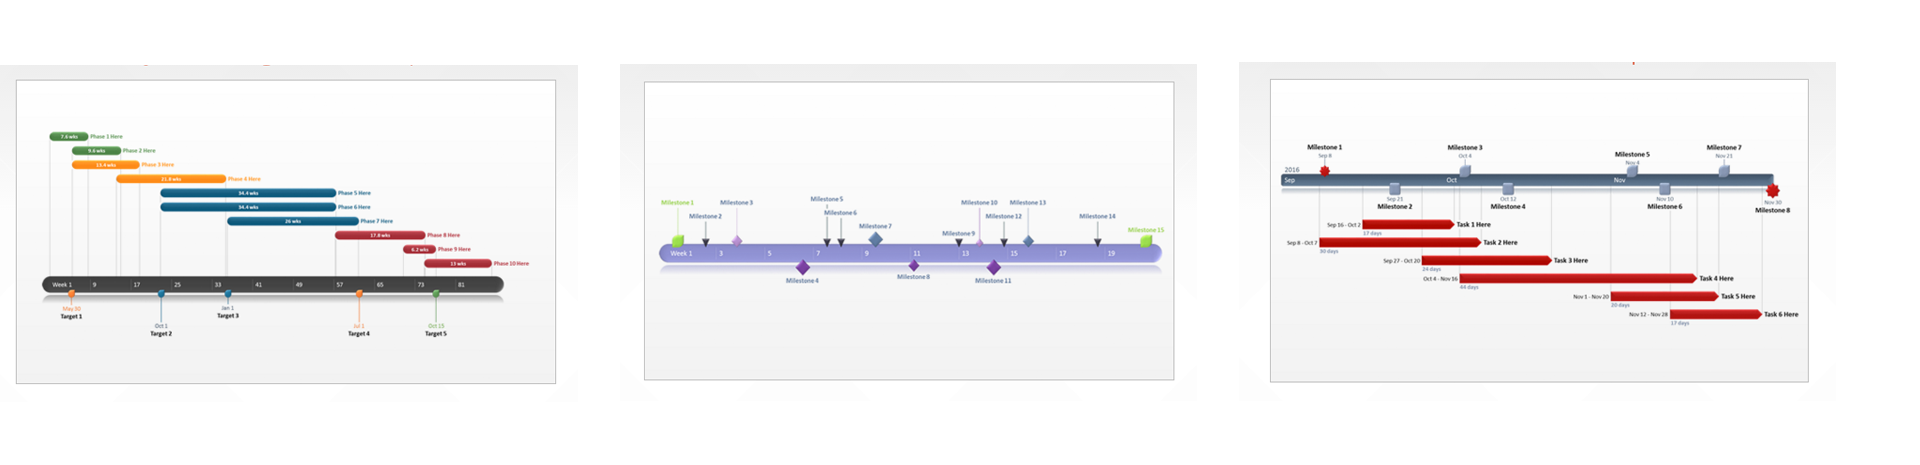
Microsoft PowerPoint
If Microsoft PowerPoint is available install it and explore the timeline template offered on its platform. This resource has several ways to view information. You only need to change the data and it's free. Visit their website.
Keep in mind
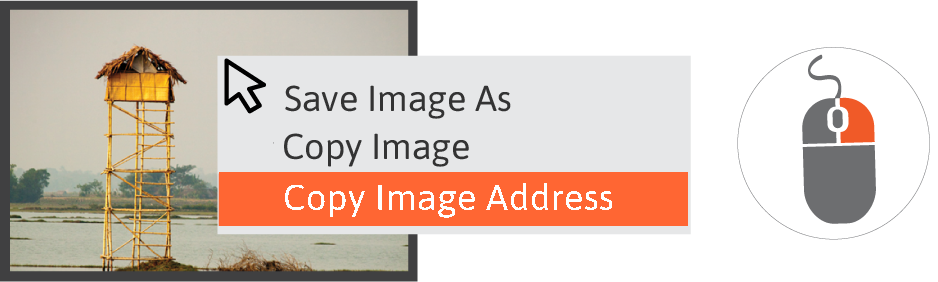
From a mobile phone you can open the image and copy the link at the top of it.
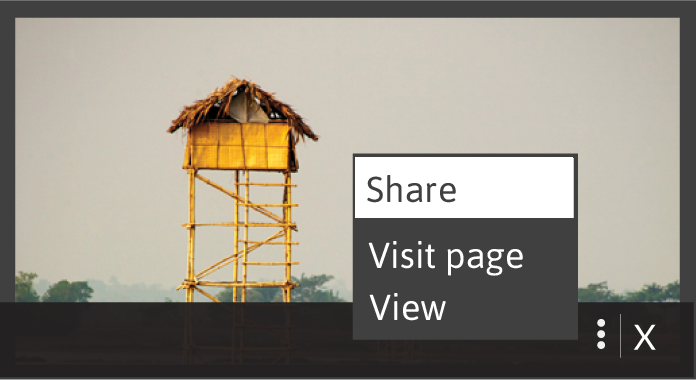
One way to recognize the web address of an image is that it usually ends with the name of a graphic format such as .jpg .png .tiff or .svg.
 Activity 2
Community map
Identifying strengths and vulnerabilities
“A map is the greatest of all epic poems.
Its lines and colors show the realization of great dreams”
Gilbert Grosvenor
Community mapping
Technology helps us tell our own stories, with images, videos and audios. When these resources are located on a map we create a multimedia representation of the social, political, historical or cultural relations of the community within the territory. This is a document that preserves the knowledge collected by the participants, with which decisions for the benefit of the community are made.
Drawing the sketch
You can find the vectorized or the sketched map on the internet. You can also search on websites like Aquaterra MapShop and Freevectormaps.
Offline Tools
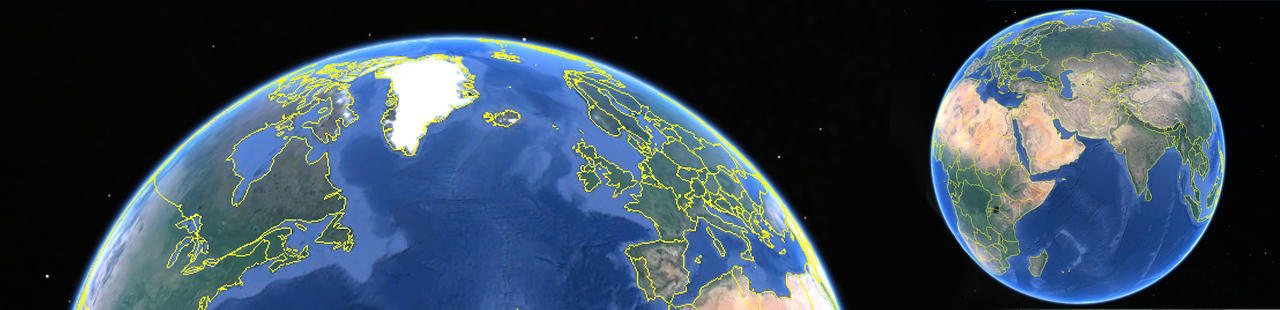
Google Earth
In Google Earth you can tour the world through maps. The maps and tours can be customized by adding pins, writing descriptions, attaching photographs, overlaying images and embedding your own 3D models, or adding them from the SketchUp library. The tours can be recorded to visualize them later.
Google Earth has versions for mobile, desktop and web. Visit their website.
Requirements
Operating systems
- Windows XP, Windows Vista o Windows 7
- Mac OS X 10.6.0 or newer versions
- Standard base for Linux - LSB Libraries 4.0
Resources
Tutorial
- Digitize the map created by the participants
- Open Google Earth
- Import the map to the corresponding coordinates (see Place the map below)
- Add other elements like pins or photographs
- Save the project File - Save - Save place as
Place the map
- Find the location within Google Earth
- Click Add Choose Image Overlay
- In Link browse until you locate the image in your computer and upload it.
- With the green frame you can modify the size, position and rotation of the image.
- To modify the image again go to the sidebar and highlight the image layer.
- Right-click and choose Get info
- Modify size.


Scratch
Create an interactive map with images, sounds, videos and pins in Scratch. You can find more information about this tool in Activity 1 or visit their website.
Online Tools
Expand your map
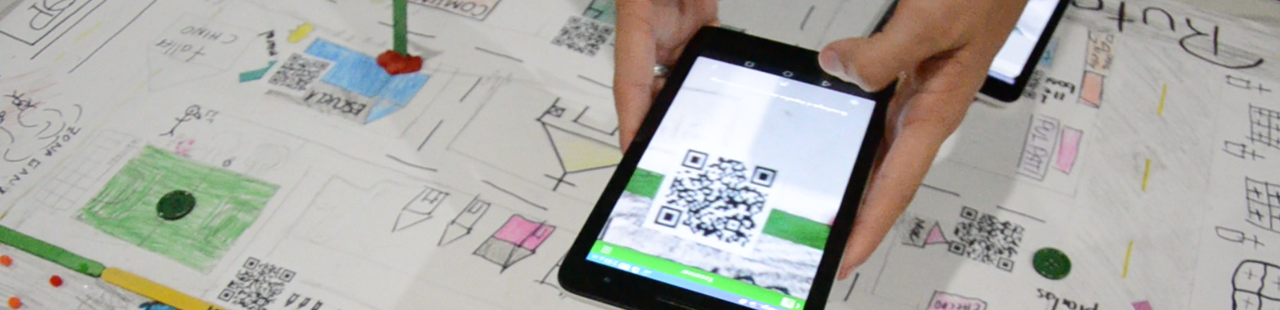
You can use QR codes to register elements on the community map such as pictures, videos, audio, satellite images and other digital content.
- Use a mobile phone, tablet, camera or computer to create or locate images in 2D or 3D, audio, video, maps, animations or any other content that can be useful to include in the map.
- Upload the content to an online account and make sure it's public. Here are a few suggested sites:
www.soundcloud.com for AUDIO
www.youtube.com for VIDEOS
www.flickr.com for IMAGES
maps.google.com, storymap.knightlab.com or storymaps.arcgis.com for MAPS
- Copy the URL of the published content and generate a QR code for each of the pieces. Here are some options:
www.qrcode.es/en/qr-code-generator/
http://qrdroid.com/generate/ - Download the codes so you can print them and paste them on the map. Make sure you get good quality prints.
- Now you can use your QR Reader to visualize the multimedia content associated with each spot on the map marked with a QR code. Here are some QR readers:
QR Droid Code Scanner (Android)
QR Reader (iOS)
StoryMap Knightlab
StoryMapJS is a free tool to help you tell stories on the web that highlight the locations of a series of events. It works on mobile devices and computers. Visit their website.
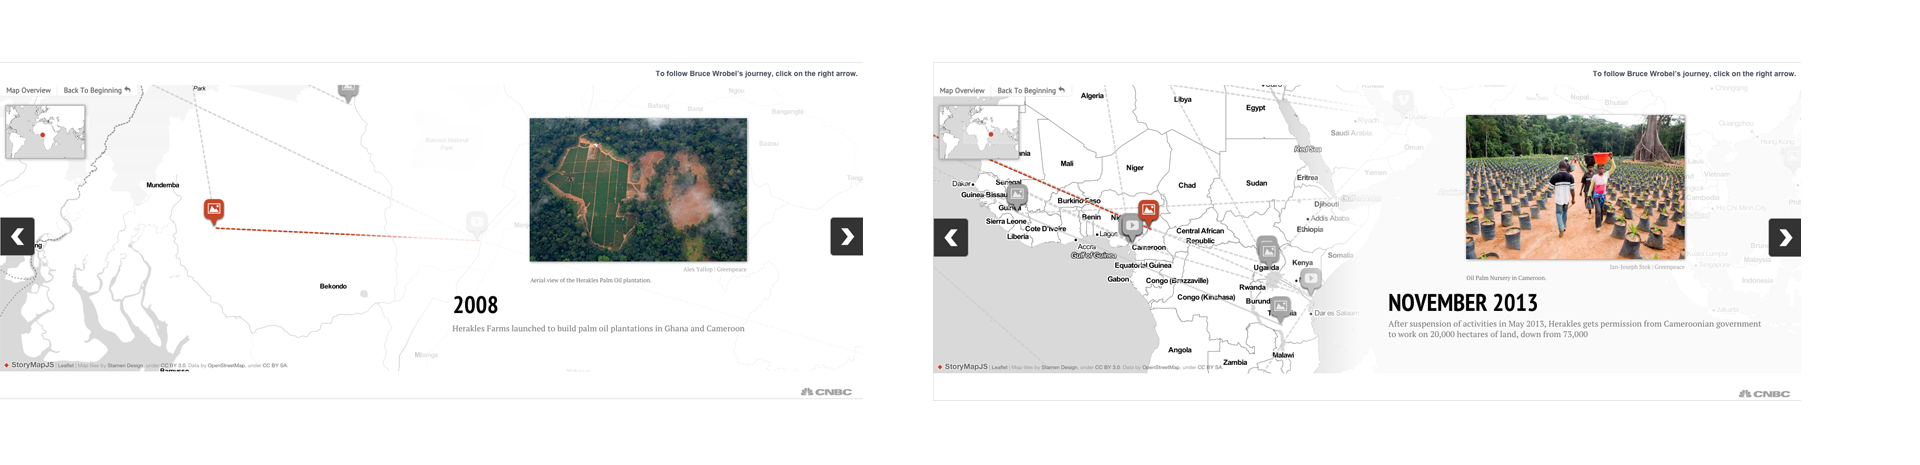
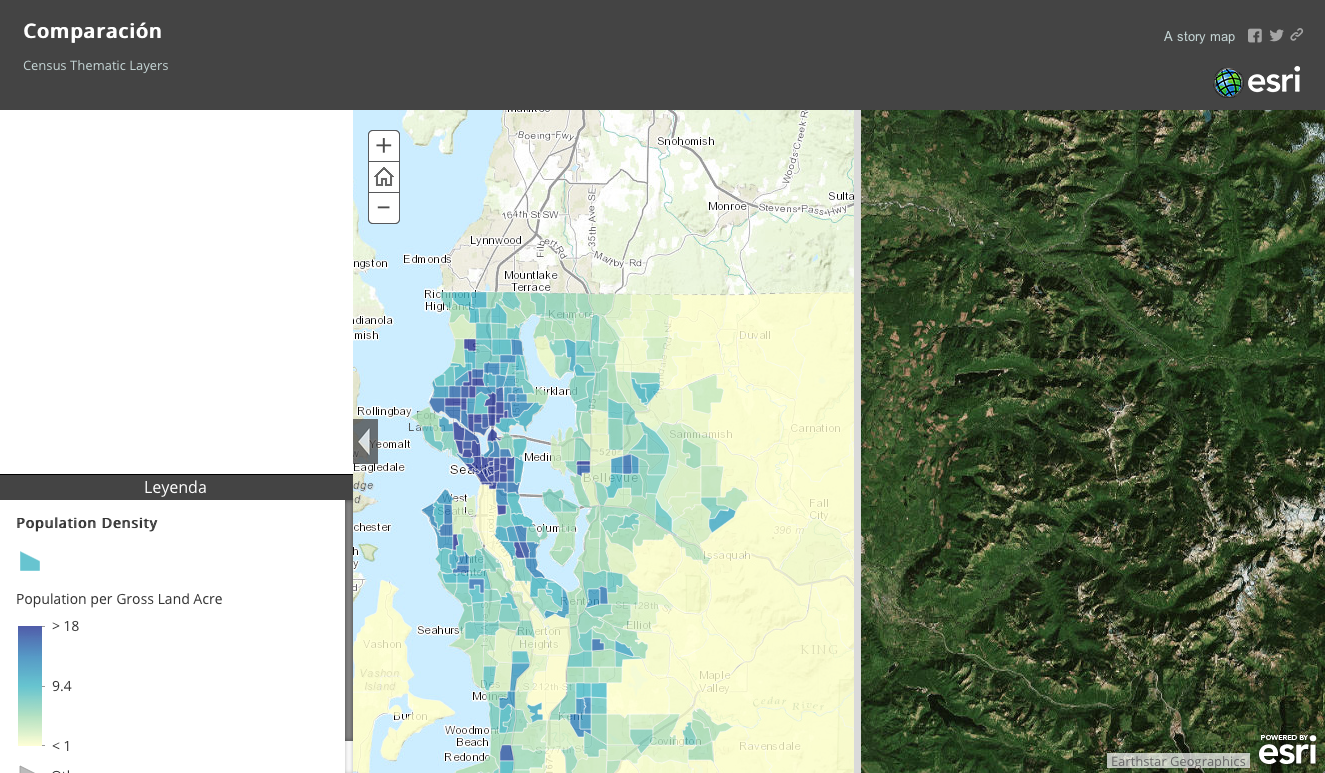
StoryMaps ArcGIS

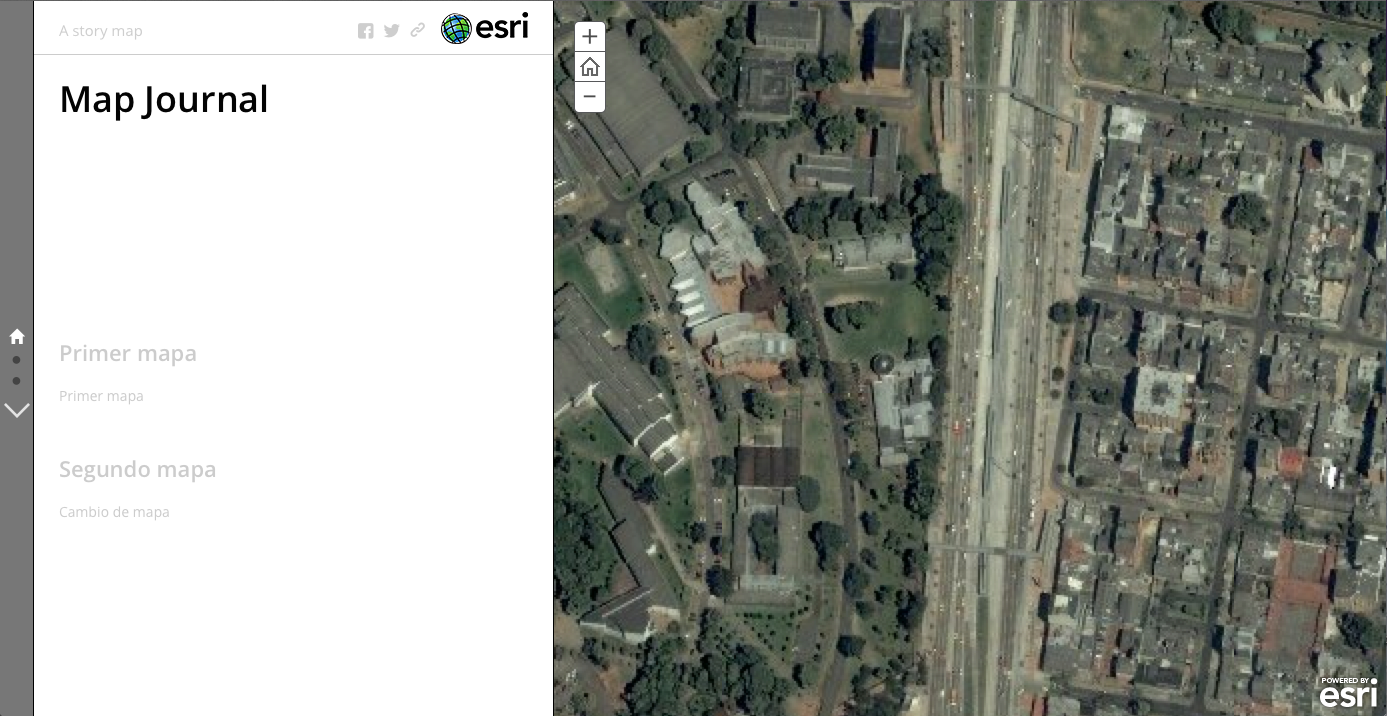
It was designed to help people tell stories with maps in different ways. Visit their website. In the Applications page you will find several templates from which to choose the best suited to tell your story.
For example if you want to compare two maps we recommend using Story Map Swipe
Or if your story has different maps and multimedia content you can try Story Map Journal
Maps.me
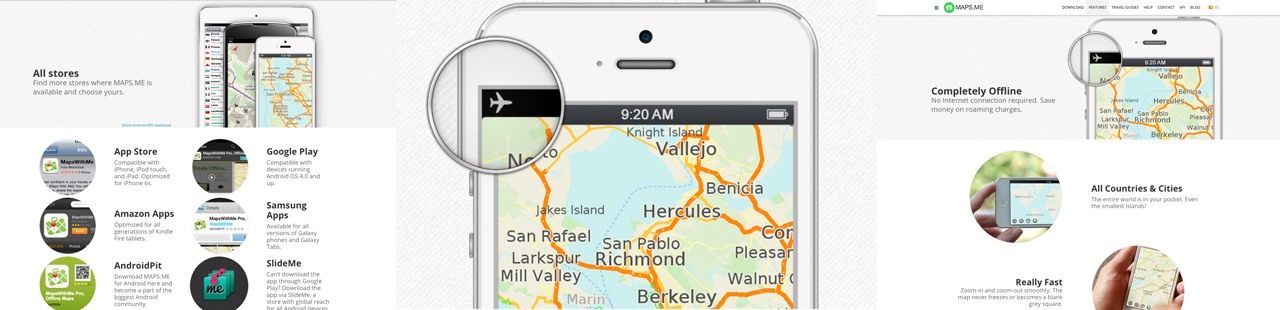
It is an application for Android, iOS and BlackBerry phones. After downloading, it can work without internet connection. It uses the global positioning system (GPS). You can search for places, mark locations and share them with others. Visit their website
 Activity 3
Frequency and impact of hazards
Discovering patterns
"Nature presents termites with challenges which they have to overcome.
Shouldn’t we also take similar advantages of natural instincts in our architecture?"
Christine Mbai
Data Visualization
Data alone tells us nothing. It has to be analysed and put into context to make sense of it. The graphical representation of data can help us find patterns, explore connexions and analyse data in a way that enables us to generate new knowledge and make better decisions.
Offline Tools
Apache OpenOffice Calc
It is a spreadsheet application where alphanumeric data (numbers, letters and other characters) can be tabulated. Generally, spreadsheets are used to perform calculations but they can also be used to organize, compare and save information. You can use them to generate charts from the data supplied.

Resources
Download the Apache OpenOffice software for the operating system on your computer and the language of your choice.
![]()
Tutorial
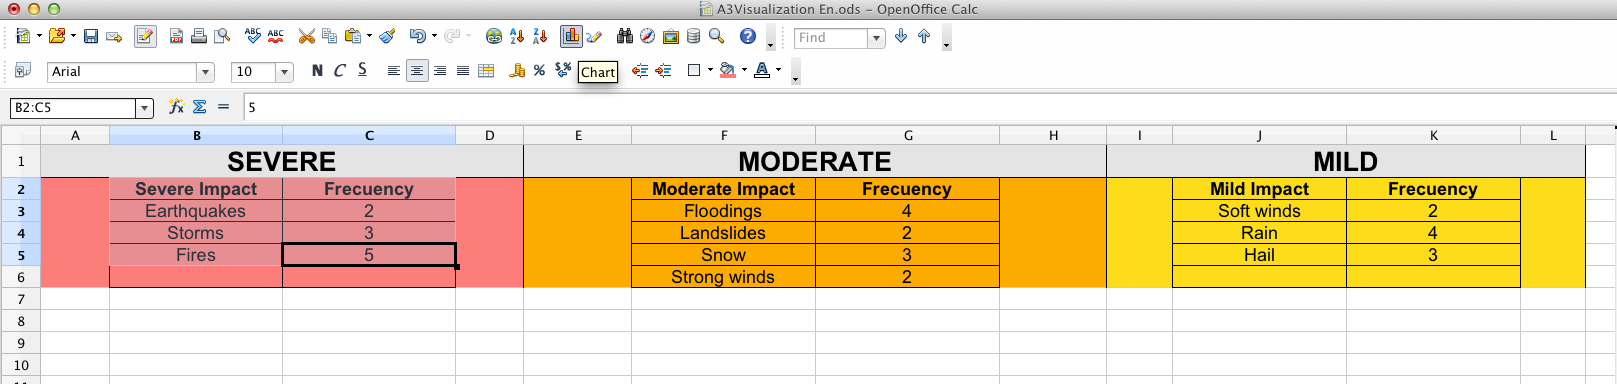
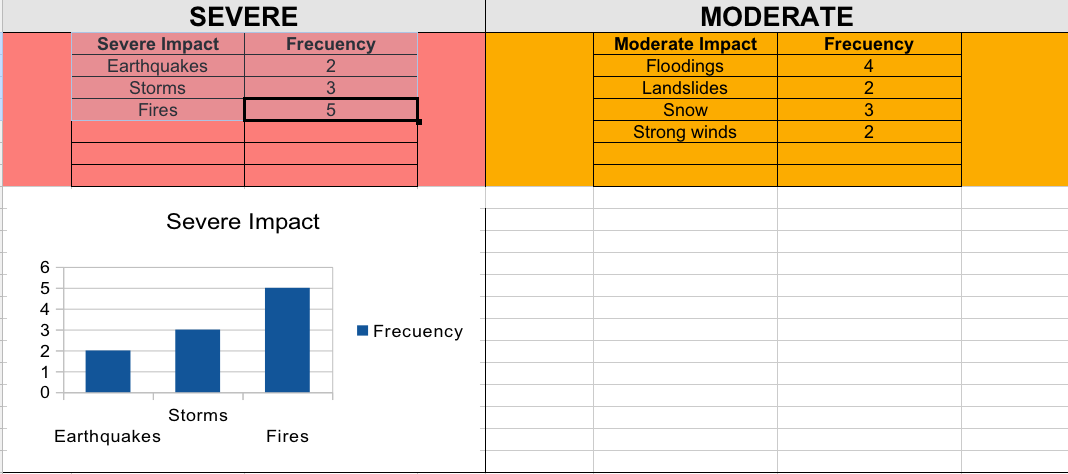
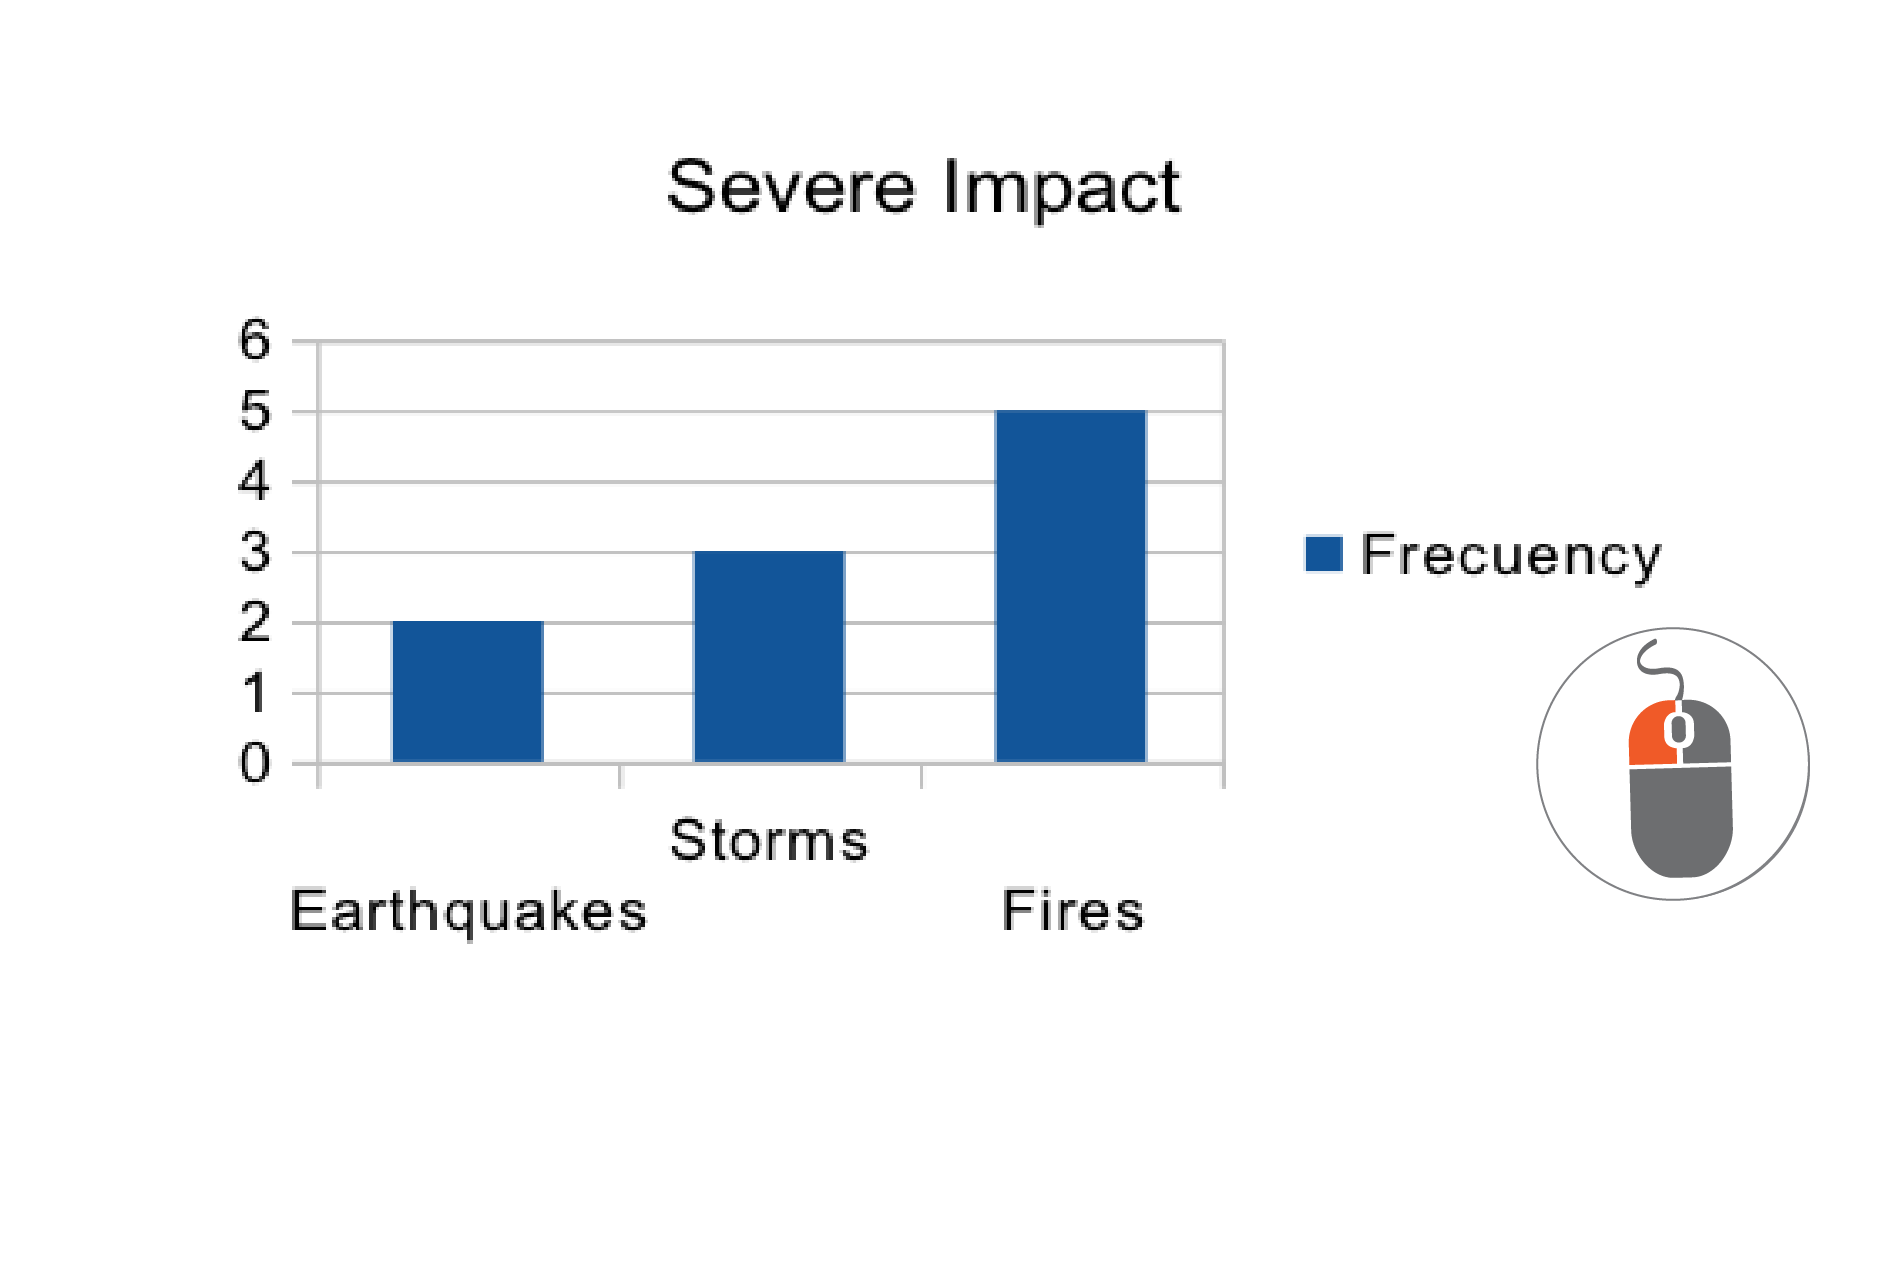
Open the Visualization file. You can change the data or create a new file.
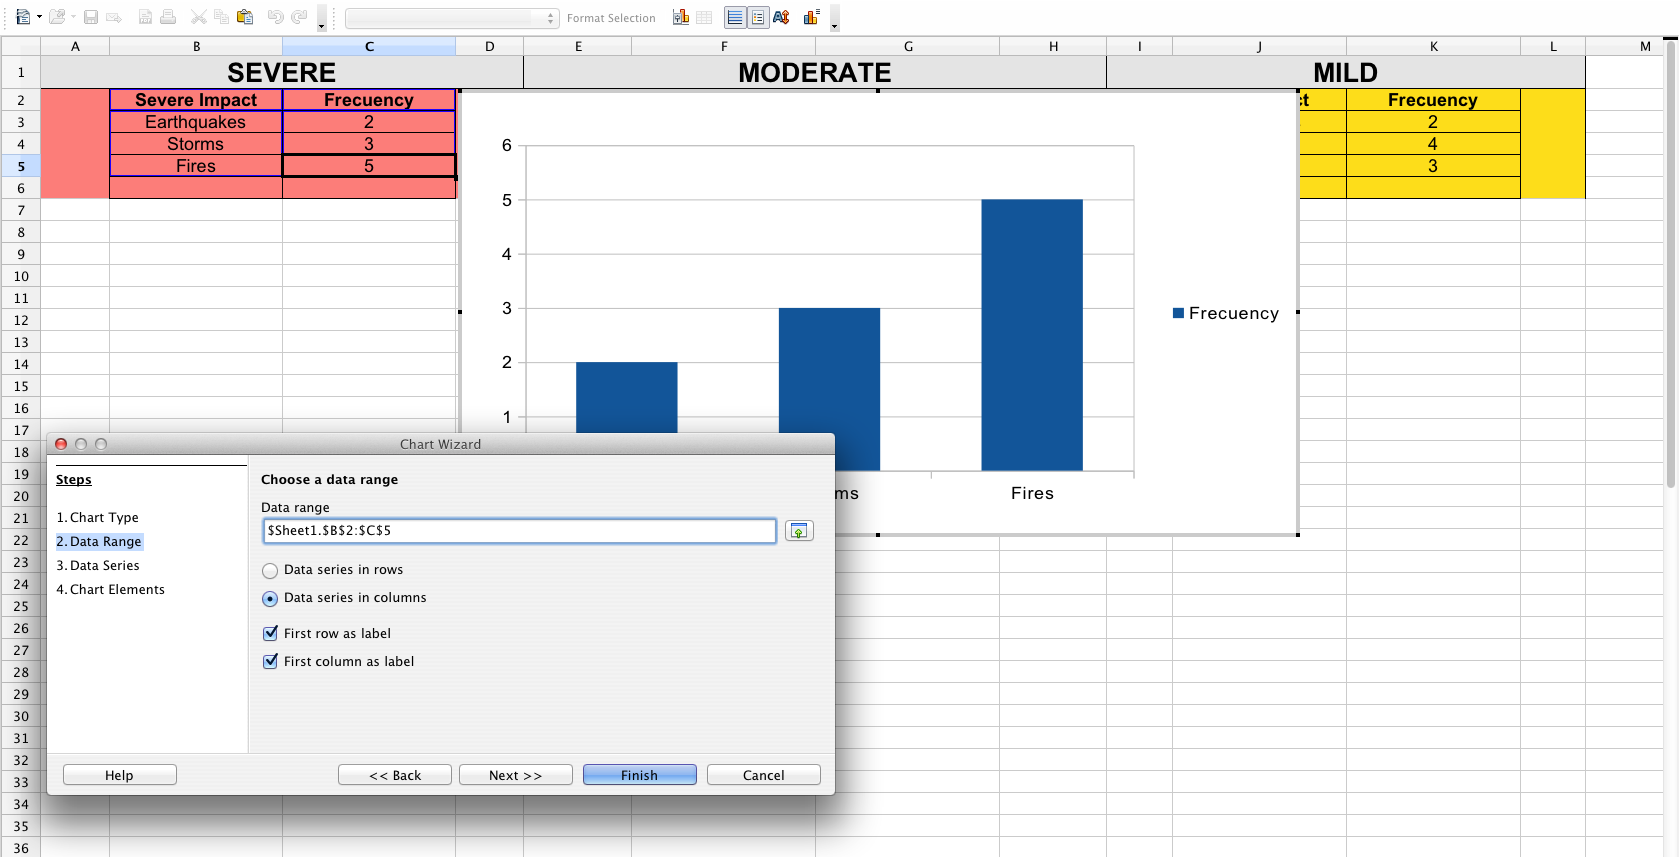
- The information collected by youth about severe, moderate and mild impact should be placed in two columns: impact and frequency.
- Select the severe impact and frequency columns.
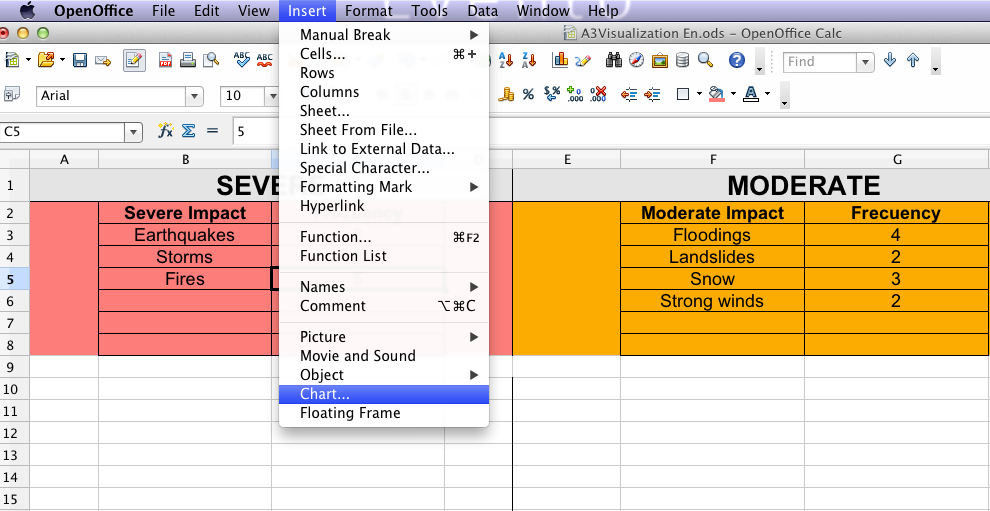
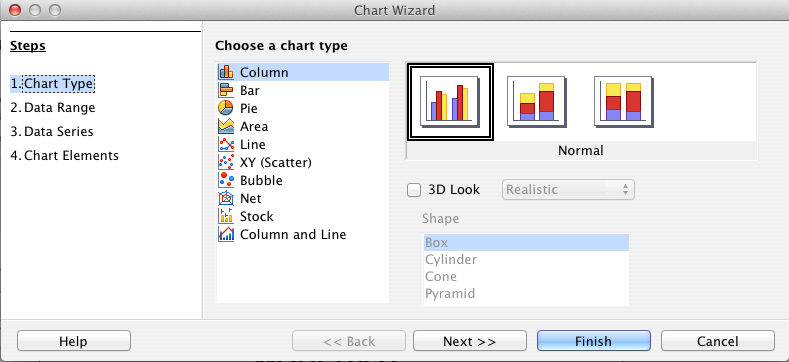
- Click the chart symbol or select Insert - Chart from the main menu.
- Choose a chart type. It could be Column.
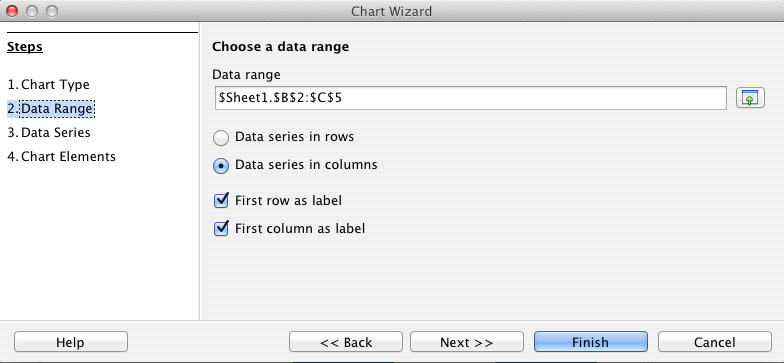
- Verify the data range. It should encompass all the cells that contain the information.
- Select Data series in columns.
- If the preview is correct the data should appear without changes.
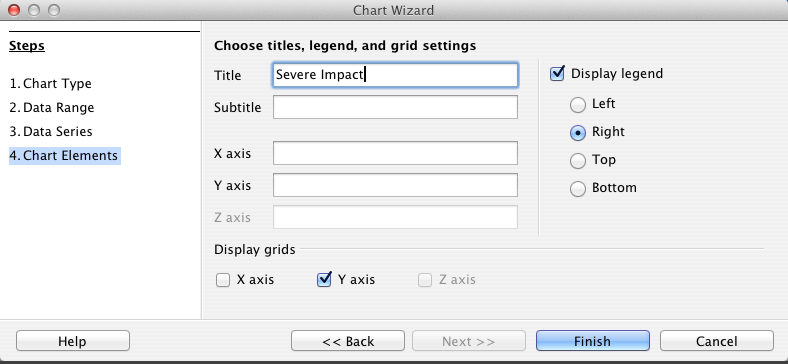
- Select Chart Elements to name your chart in the Title space and click on Finish.
- You can do the same with all other charts.
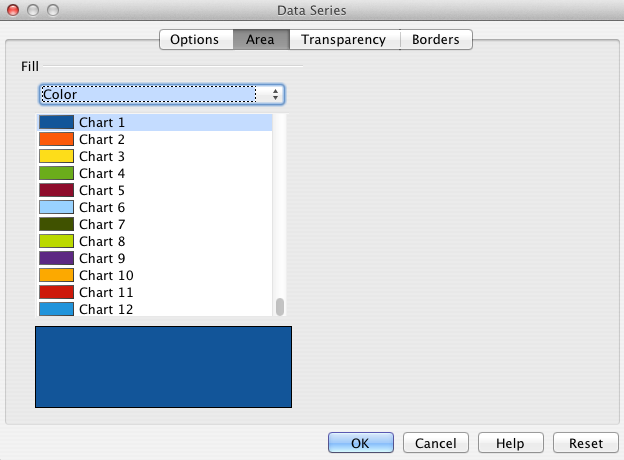
- To change the color of a bar select it first.
- Then double click.
- Select the desired color and click OK.
MakeyMakey
Makey Makey is an invention kit for the 21st century that lets you turn everyday objects into touchpads and combine them with the internet. It's a simple Invention Kit for Beginners and Experts doing art, engineering, and everything in-between.
You can combine MakeyMakey with Scratch to call attention to important data by telling an interactive story. See Activities 1, 2 and 6 for information about Scratch.
Online Tools
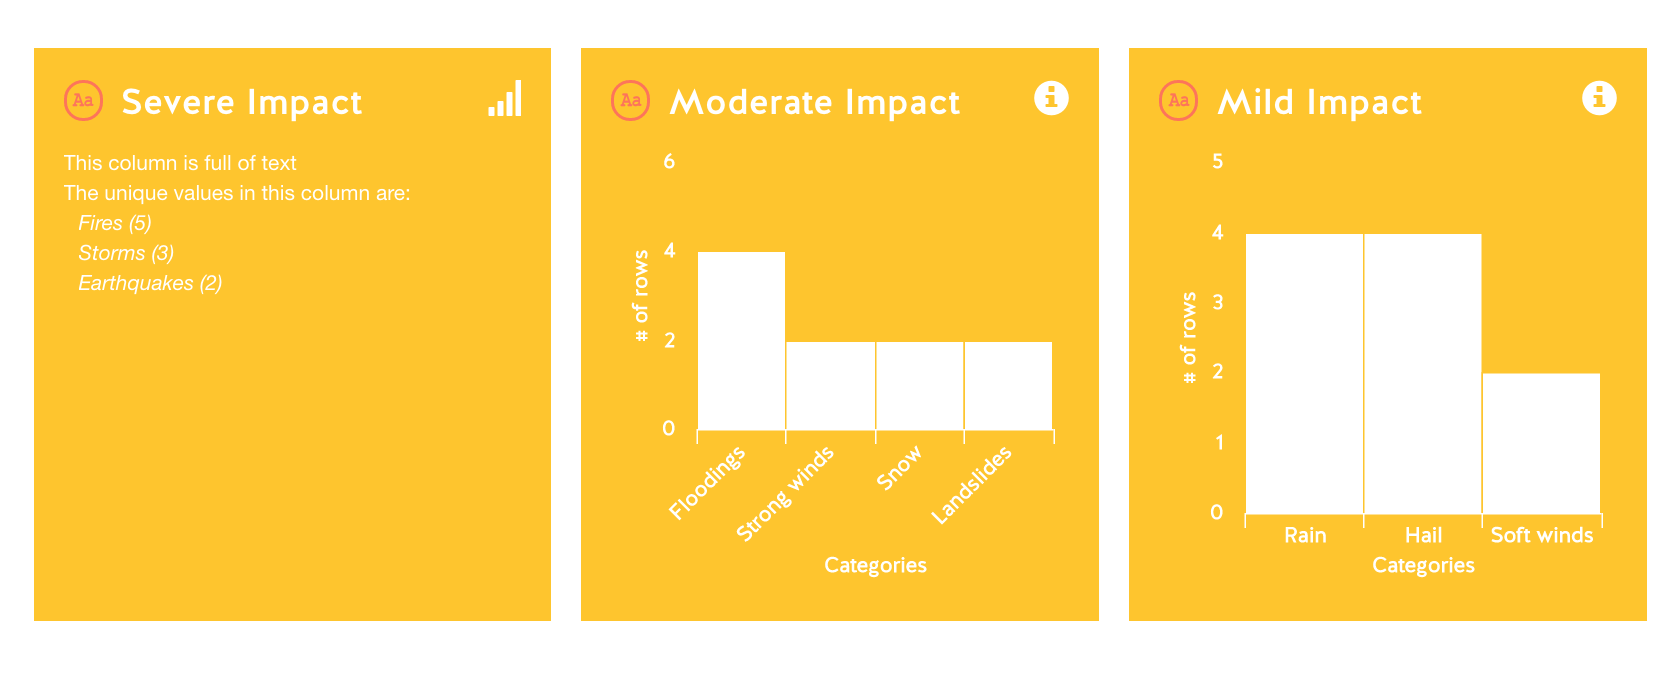
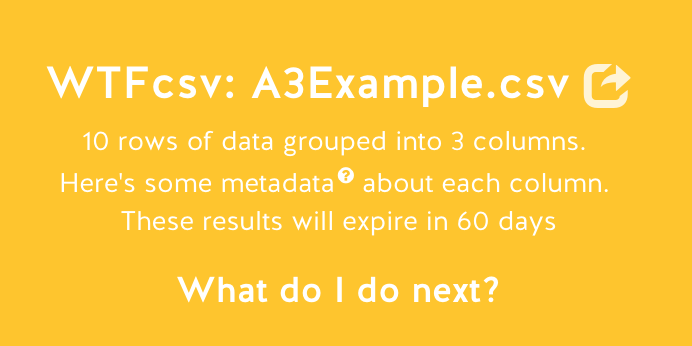
Databasic WTFcsv
It is a tool that generates charts using the data contained in a .csv file. These files can be created in a spreadsheet application like Open Office Calc, Google Docs or Excel. Visit their website.
![]()
Tutorial
- For this tutorial you need a spreadsheet that contains data saved as a Comma Separated Values or CSV text file. You can use the Visualization file opened in the previous tutorial (Apache OpenOffice) or create a new one.
- Open the spreadsheet and save it as a .csv file. In Apache OpenOffice go to the main menu and select File - Save As - Text CSV. You can also use the A3VisualizationDataBasic.csv example.
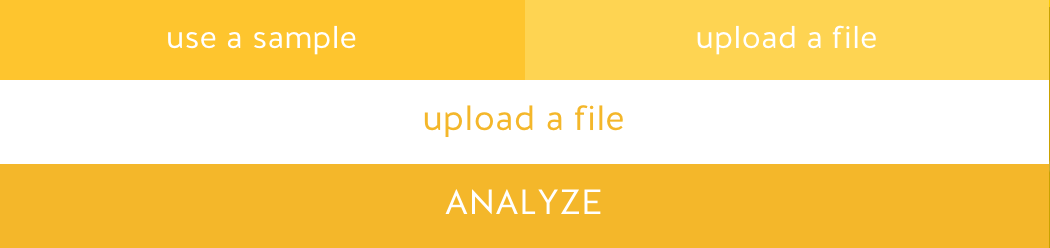
- Go to the WTFcsv platform and press upload a file. A window opens where you can search for the .csv file you just saved on your computer. Select it and press the Open button.
- Now press Analyze in the WTFcsv platform.
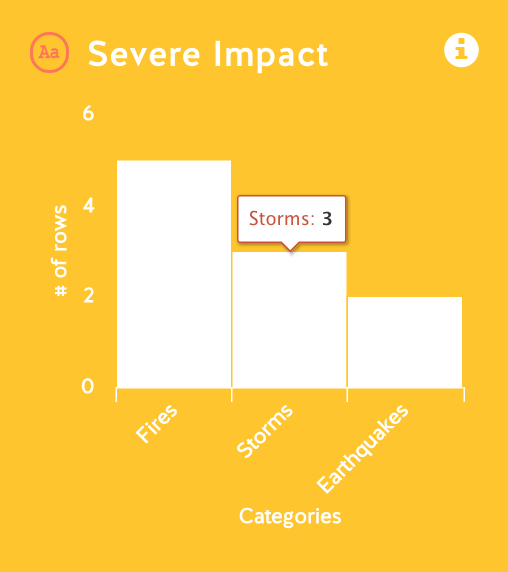
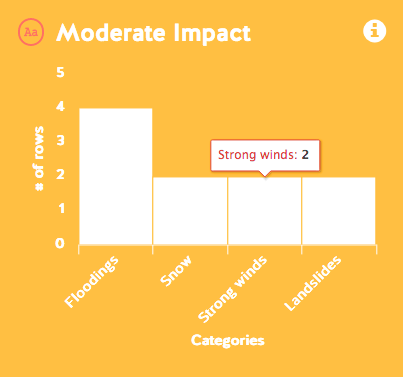
- Review each chart.
- Hover over each column and view the data.
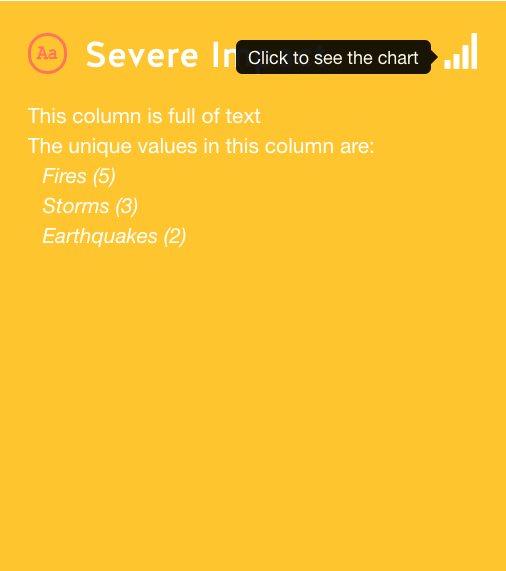
- Press the icon
 for more information.
 - To return to the chart press the graph logo.
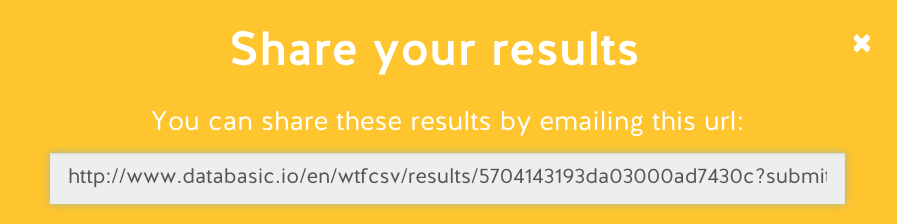
- To share the results press the share icon next to the name of your file.
- Select and copy the url. Then paste it into an email.
- You can also explore the examples offered on the platform. Go to WTFcsv and press use a sample. Choose the sample you want to view and press Analyze.
 Activity 4
Safe and unsafe shelter and settlements
Recognizing vulnerabilities
"Earthquakes never kill people,
but the collapse of the buildings kills people"
Shigeru Ban
Information management
Collecting, classifying, filtering, distributing and archiving information can be aided by digital tools. Documenting in a variety of formats helps discern if a particular condition constitutes a vulnerability or a capacity. By taking photographs and videos, recording interviews with people from the community and classifying the evidence together, with the help of a technical adivsor, everyone can learn to recognize what increases or decreases the risks related to shelter in the community.
Online Tools
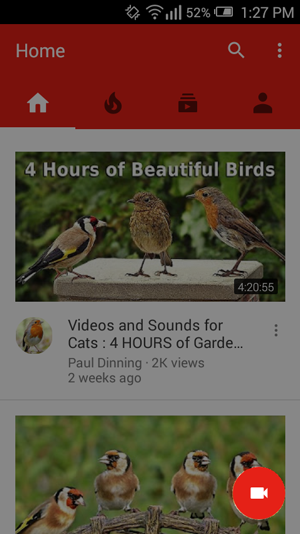
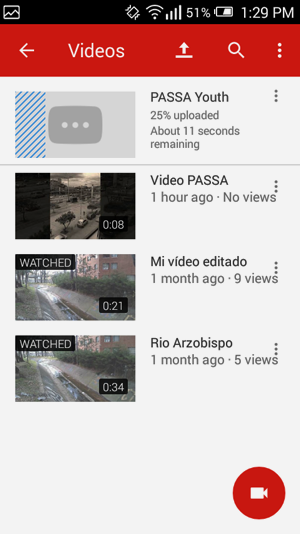
YouTube
YouTube is a video-sharing community owned by Google. The site allows users to upload, view, rate, share, and comment on videos. Available content includes video clips, TV show clips, music videos, audio recordings, movie trailers, and other content such as video blogging, short original videos, and educational videos.
Tutorial
This tutorial is good for documenting conditions that make the community safe or unsafe. Keep in mind that the interface might vary depending on the mobile device and platform.
- Download and open the YouTube app in the App Store or Play Store.
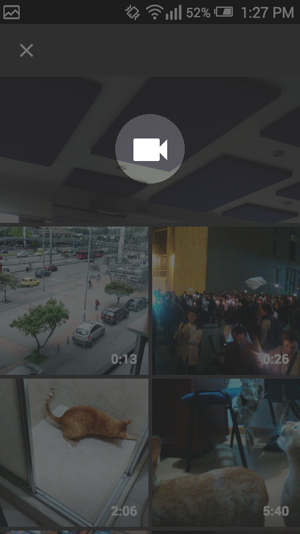
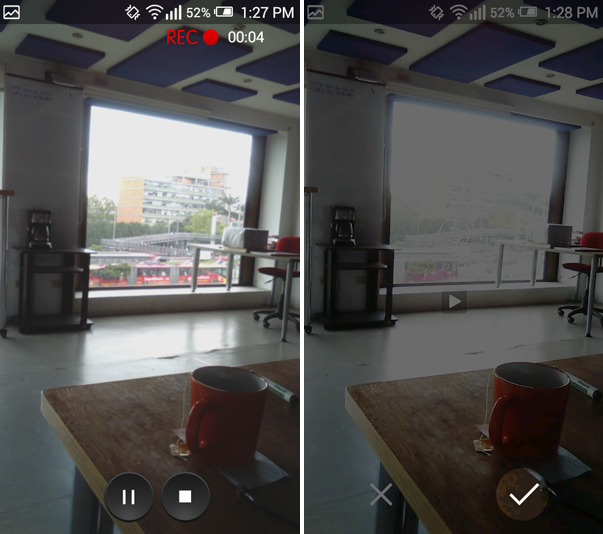
- Tap the red Camera button.
- Tap the video you wish to upload or start a new recording.
- Press stop and then the tick mark icon to confirm your recording.
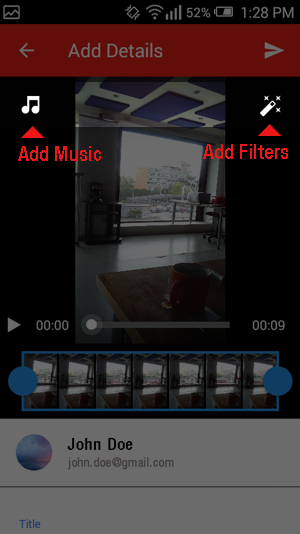
- You can add music and filters to your video.
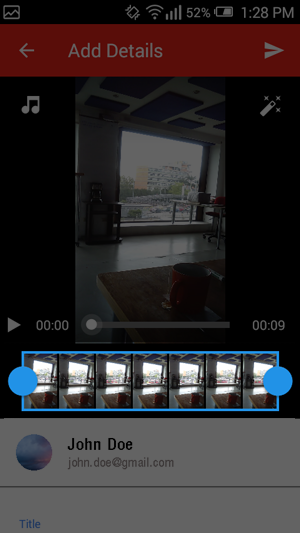
- Tap and drag the bar on either side of the timeline in order to adjust the starting and stopping points of your video.
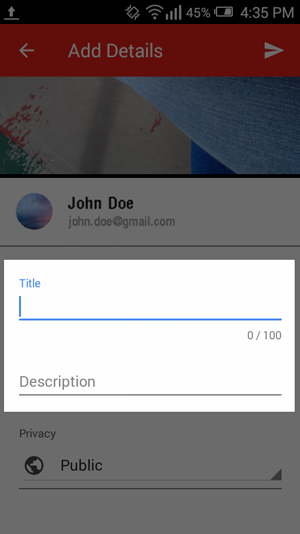
- Enter the title and the description.
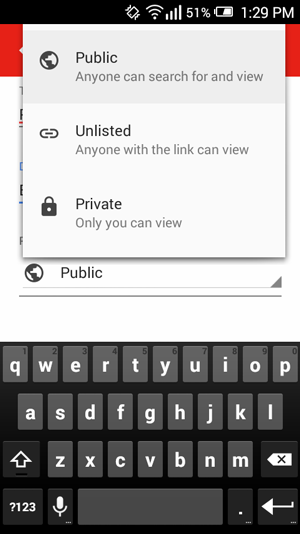
- Select the privacy of your video. Public allows anyone to find and view the video; Private limits viewing to the people you choose and they have to sign in to their Google account that you authorize to watch it; Unlisted can be viewed by anyone who has the link. Note that only the public videos will appear in YouTube’s search results.
- Upload and share.

Offline Tools
If you do not have internet access, you can still record with your mobile phone, or another device, and edit in a computer with the video editing tools that come by default with the operating system:
Movie Maker
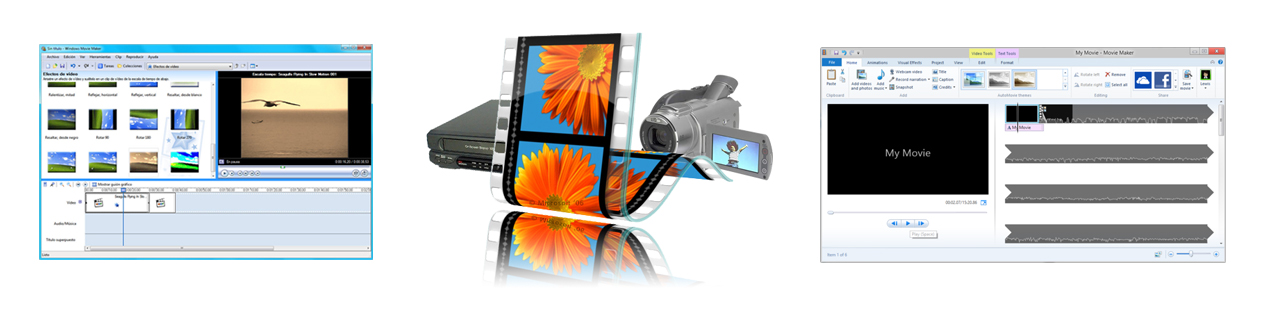
This is an easy to use and intuitive software that comes with Windows; if you do not know how to use it or have questions, you can visit their official website.
iMovie
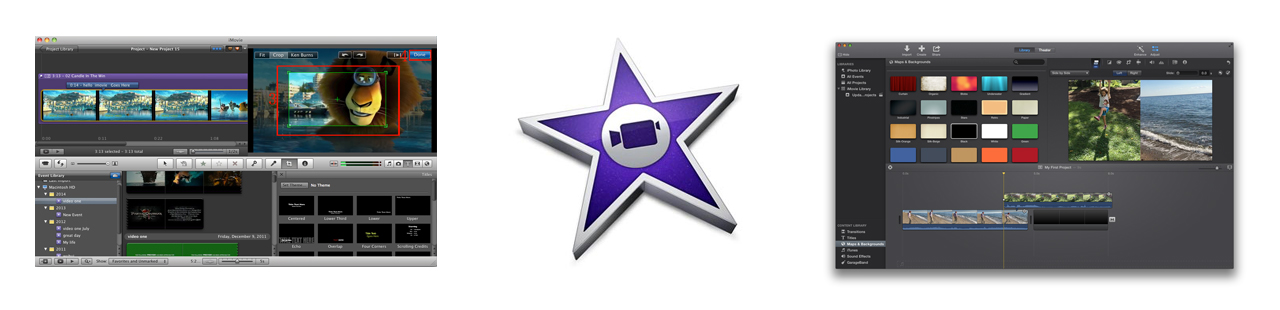
This is an easy to use and intuitive software that comes with Mac and iOS; if you do not know how to use it or have questions, you can visit at their official website.
 Activity 5
Options for solutions
Brainstorming
“We’re not going to change the world; we’re going to build
network of people around the Earth who are going to change it”
Nainoa Thompson
Poster
It is a graphic and artistic representation to spread an idea or a product. In this case, to show the solution to a problem. We refer to the phrase "a picture is worth a thousand words".
Offline Tools
Krita
It is optimized to generate digital art and create graphic compositions from images, illustrations and drawings. It has specialized tools such as brushes, gradients and textures, among others. It also lets you choose the language of the interface. Visit their website.
Resources
Tutorials
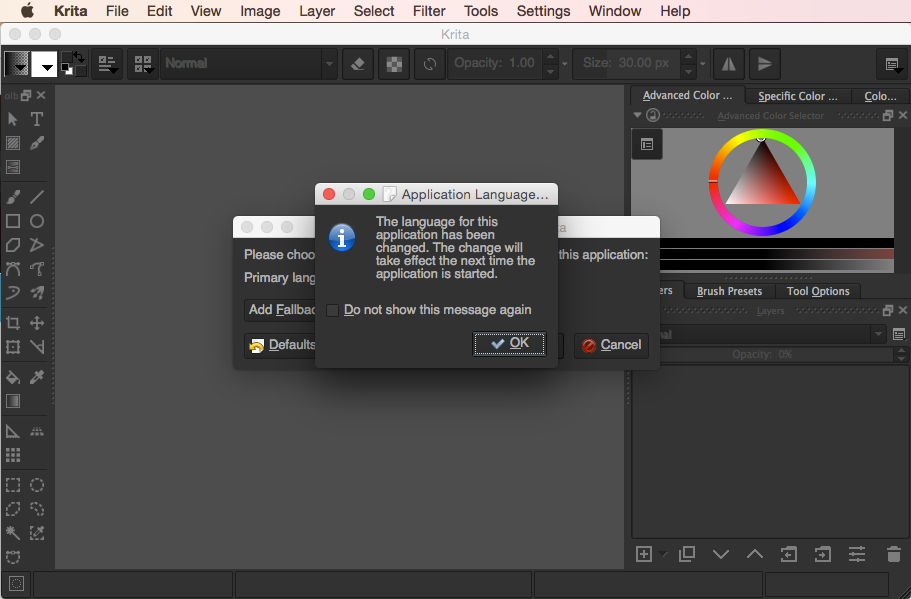
Before starting select the language. English is the default.
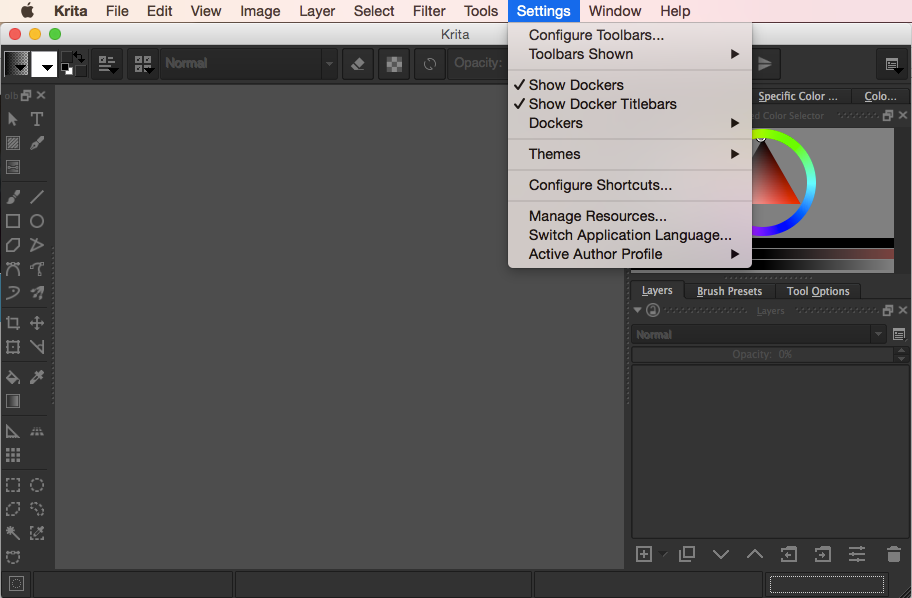
- Select Settings.
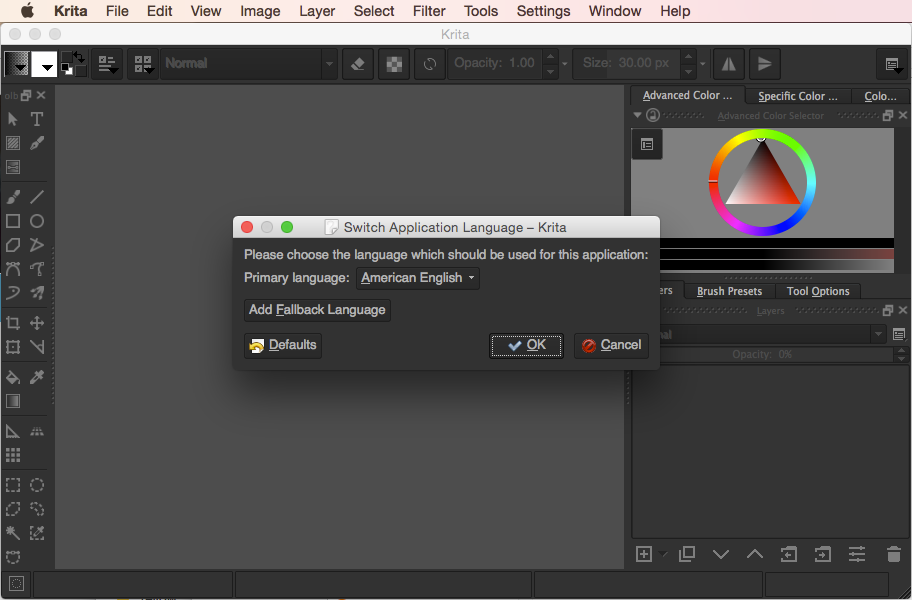
- Press Switch Applications Language.
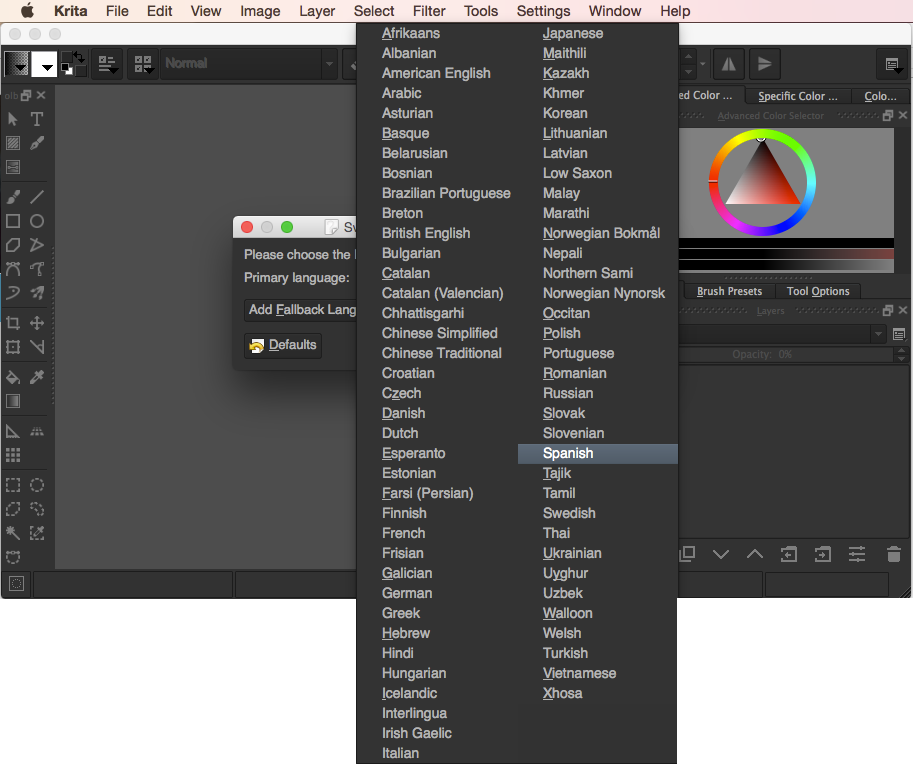
- Choose the desired language.
- Click Ok.
- A window appears. Click Ok.
- Quit Krita.
- Reopen Krita and the application should be in the chosen language.
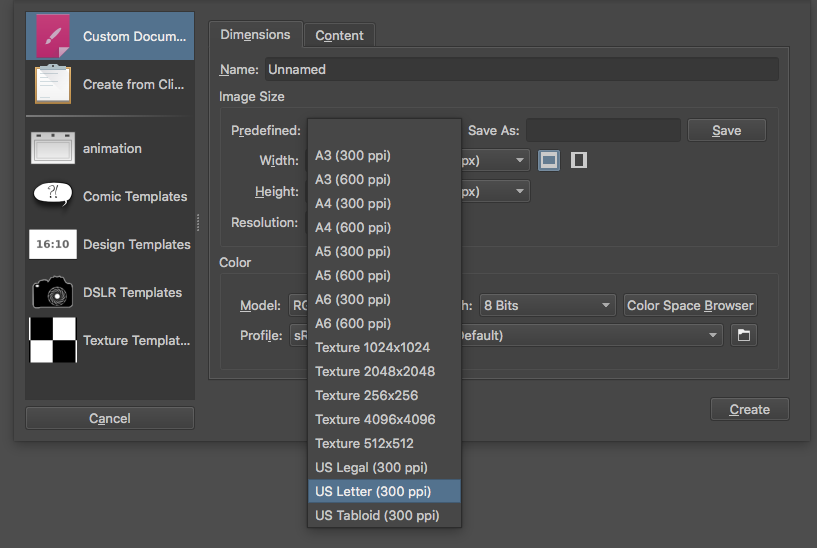
- Select File - New.
- Choose the canvas size. For the moment you can use letter size.
- It is recommended to drag images from their folder directly onto the canvas.
- To create a new layer click on the + icon at the bottom of the layer window.
- There are several layer options. We recommend using the paint layer.
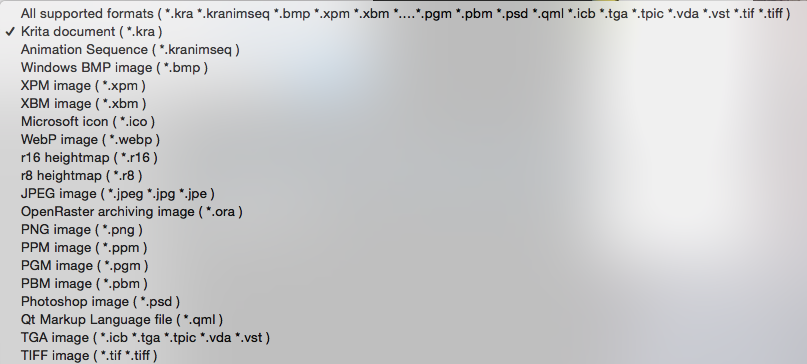
- Save the original .kra file.
- Export to .pdf.
- Also Save As .png or .jpg so your poster project can easily be viewed in other computers and devices.
To begin

Krita offers additional resources. You can download some or view them directly on their website.
Online Tools
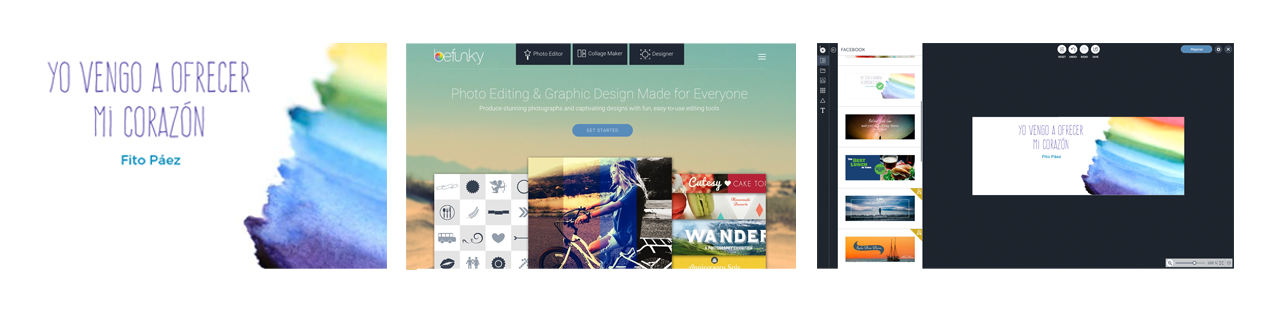
Befunky
It is a graphic editor where you can retouch photos, make posters and invitations, and much more. To use Befunky you don't have to create an account and its platform is multilingual. It has three spaces: photo editor, collage and designer. It has a quick tour (optional) of the tools on the platform.
You can create your project using templates to which you may add text, clipart and other images from its library, as well as your own drawings and images. The final product can be saved as a .jpg or .png image. Visit their website.
You can start by exploring the following templates:
- Blogger Resources - Infographics.
- Event Graphics - Invitations: See this tutorial to learn how to modify the templates.
Canva
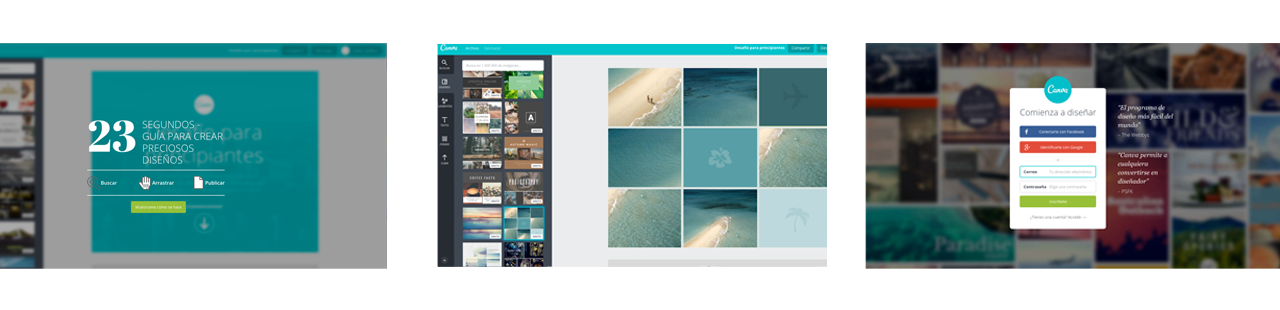
It is a versatile tool to create posters, presentations and other designs from templates or custom dimensions. Just create an account to log in and you can choose between over a dozen languages for its interface.
It offers free and paid templates and graphic elements. If you choose one that requires payment, the file can be saved for free with a watermark. You can also use your own images and graphic elements. Visit their website.
Chogger
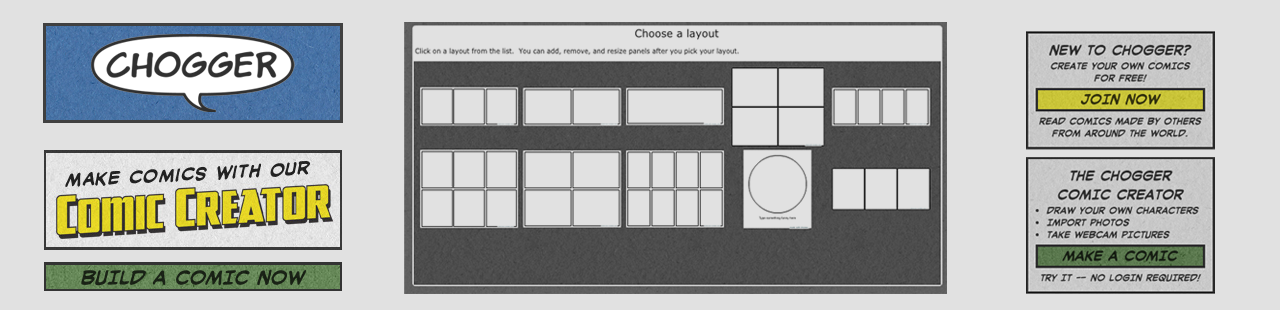
It's an intuitive tool to create comics and has templates for different vignettes. It doesn't require an account; you can start building your comic right away. You can include images available on the web, upload them from your computer, use your webcam or draw them directly on the tool. To start creating comics visit their web page.
 Activity 6
Planning for change
Opening paths
"We do not need magic to change the world,
we carry all the power we need inside ourselves already:
we have the power to imagine better"
J.K. Rowling
Visual planning
In order to plan for change, you must first identify a problem that makes the shelter or settlement unsafe and a viable solution to it; the plan are the steps the group decides to implement in between the unsafe and safe conditions. A way to plan is through images and there are many tools that help to support this process. Scratch, for example, makes it easy to modify the unsafe image until it illustrates the safe condition, identifying precisely the needed interventions to move from the current to the desired situation.
Offline Tools
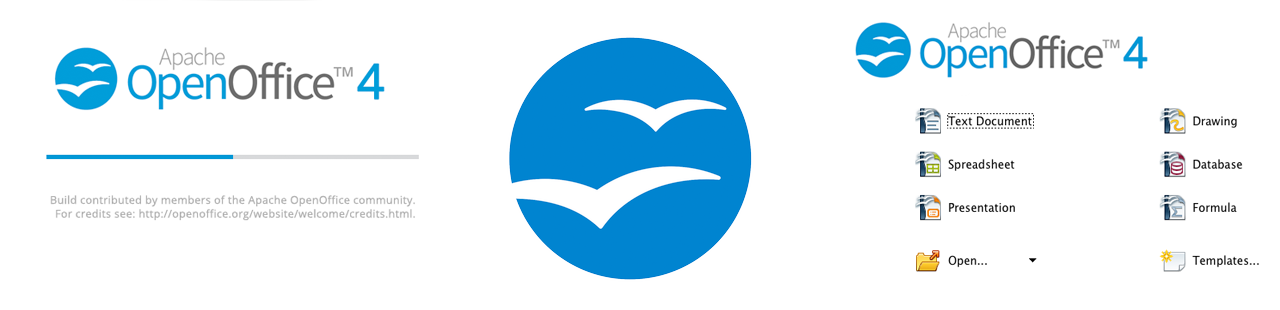
Apache OpenOffice
It is a multilingual suite that brings together several applications for creating documents. It includes a word processor, multimedia presentation software and a spreadsheet. Visit their website.
Resources
Download the Apache OpenOffice software for the operating system on your computer and the language of your choice.
Tutorial
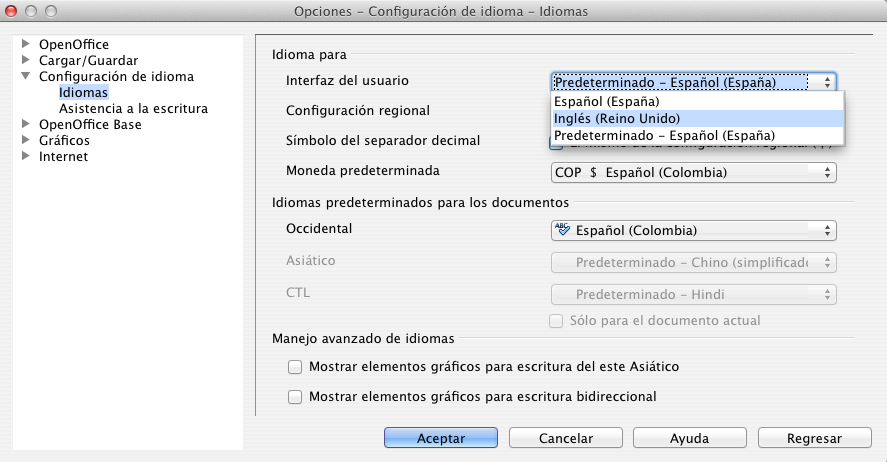
When you download the software, you can select your preferred language for the interface, which by default is English. If you want to change it later, you must download the Language Pack you want and install it.
- Open OpenOffice. In the OpenOffice menu select Preferences.
- Go to Language Settings.
- Click on Languages, then find User interface.
- From the dropdown menu select the language you want to switch to and click OK.
- Quit the application and reopen it.
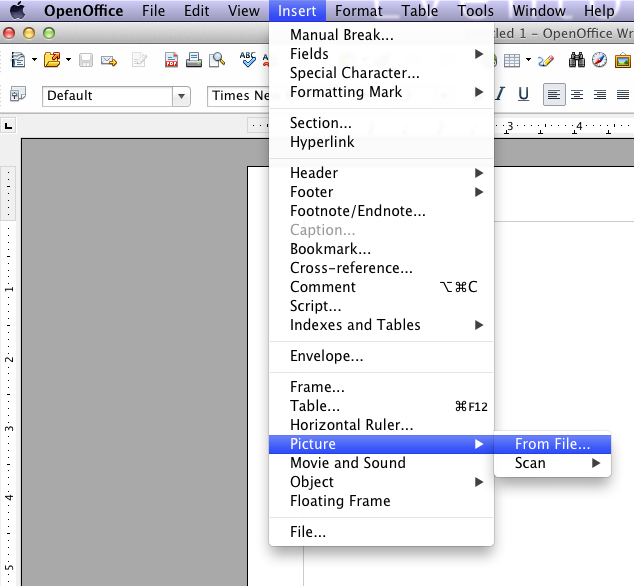
Insert images in a Text Document
- Go to the Insert menu and hover the mouse over Picture.
- You can now choose to insert the image From File or Scan.
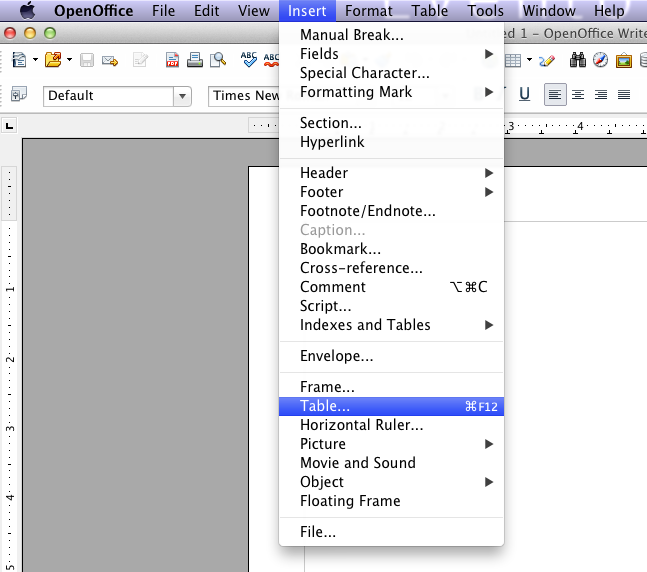
Insert Table
- Go to the Insert menu and select Table.
- Choose the amount of rows and columns for the table and click OK.

Online Tools
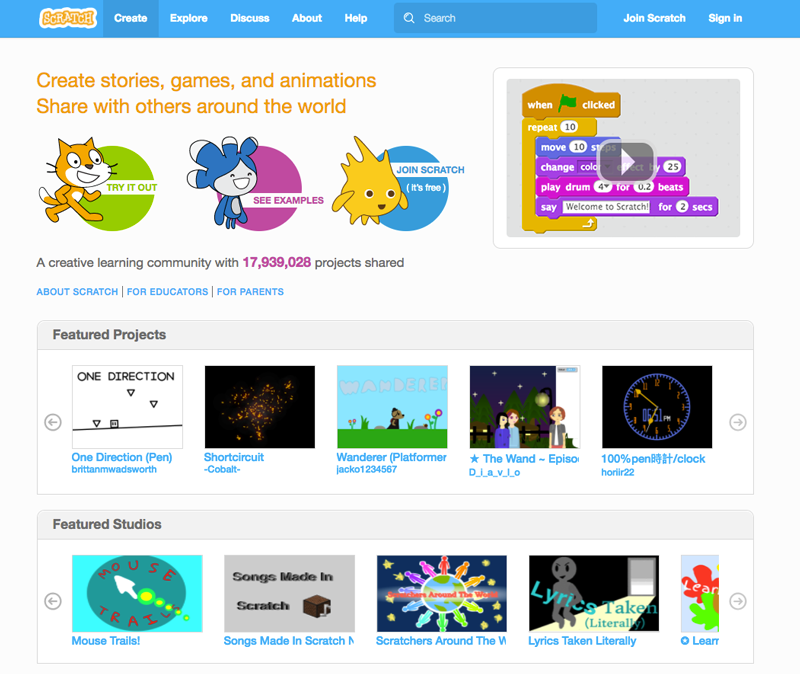
Scratch
In Scratch you can use the characters that come with the application, import images, or draw your own creations. It also lets you add text and audio. Visit their website. You can use Scratch to make a static poster and also to give life to animations and interactive presentations to show your settlement "before and after" the solution.
Tutorial
This tutorial shows how to use Scratch directly online. If you do not have uninterrupted internet access, you can download Scratch to your computer and use it as shown in previous activities.
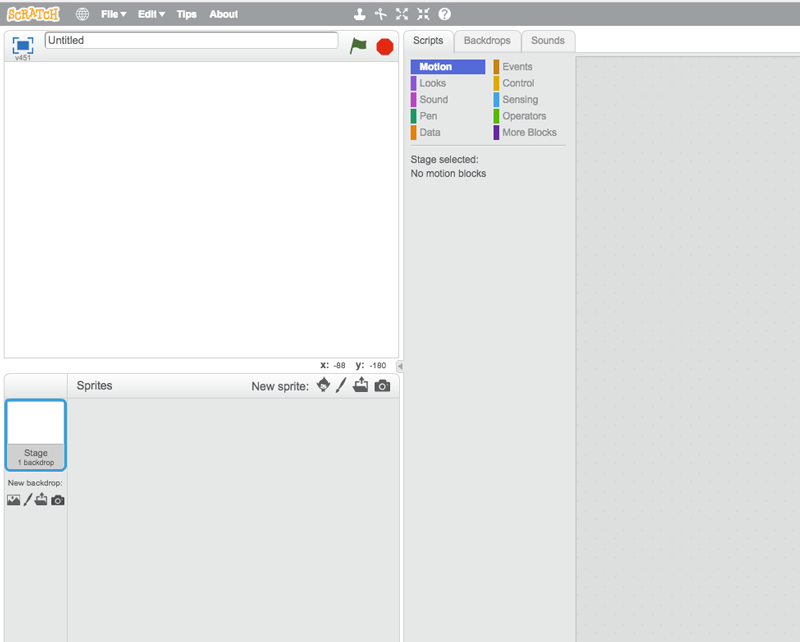
Start
- Go to scratch.mit.edu
- Select Create.
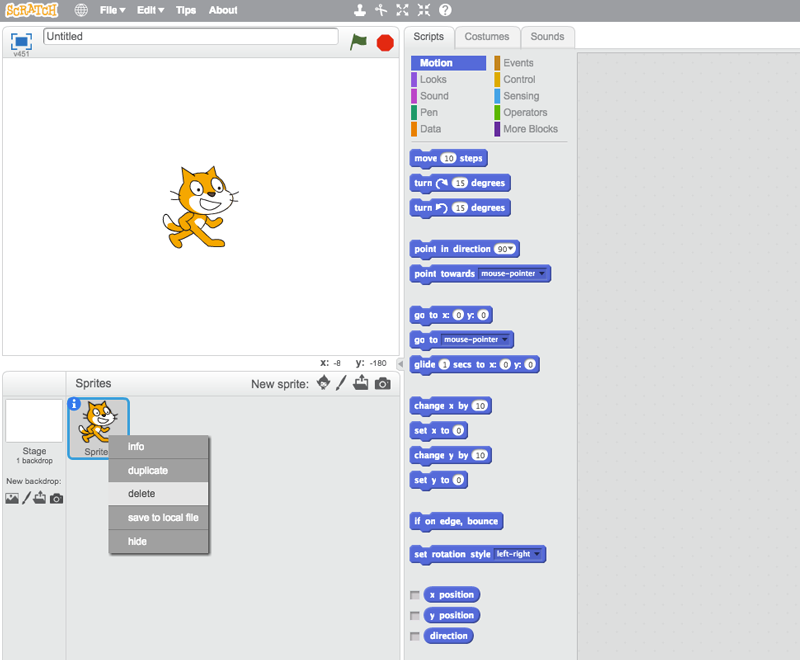
- Delete the sprite that shows up by default in the Sprites section by right-clicking it and selecting delete from the drop-down menu.
Before and after
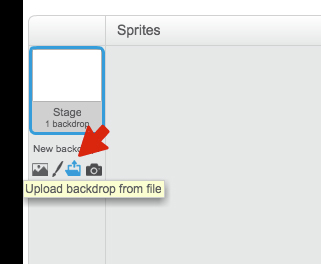
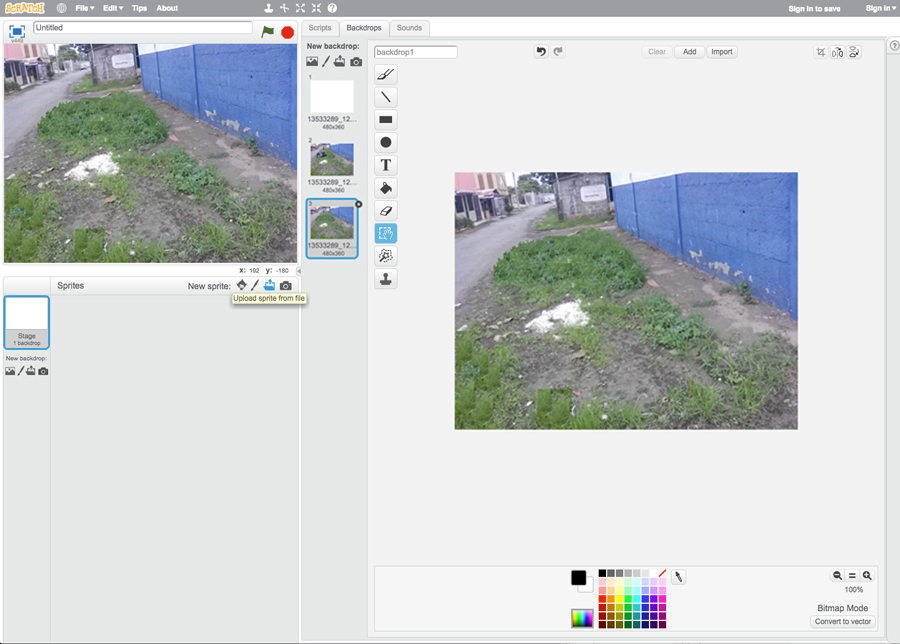
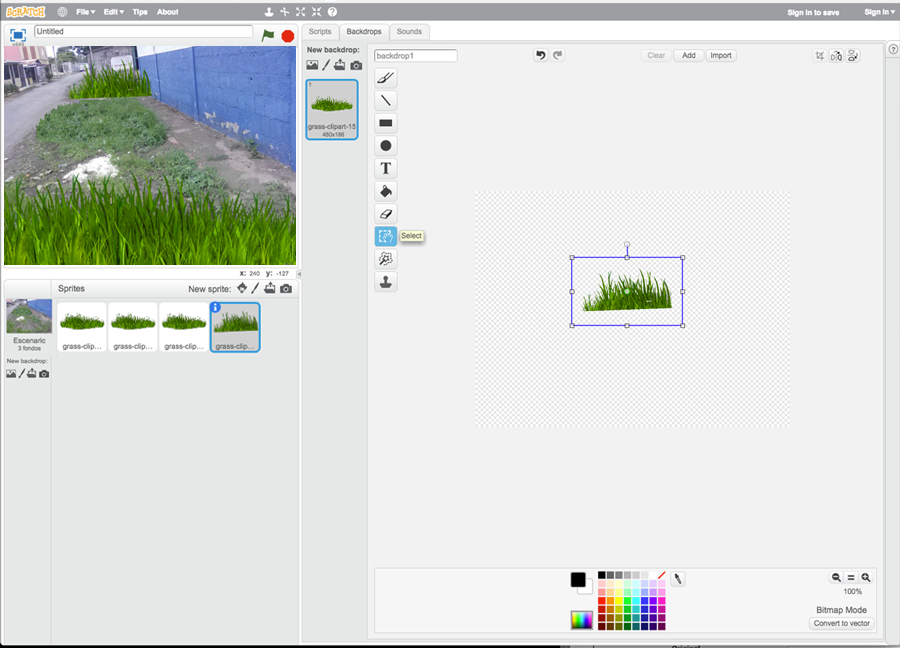
- In New Backdrop select Upload backdrop from file and upload the image you want to modify.
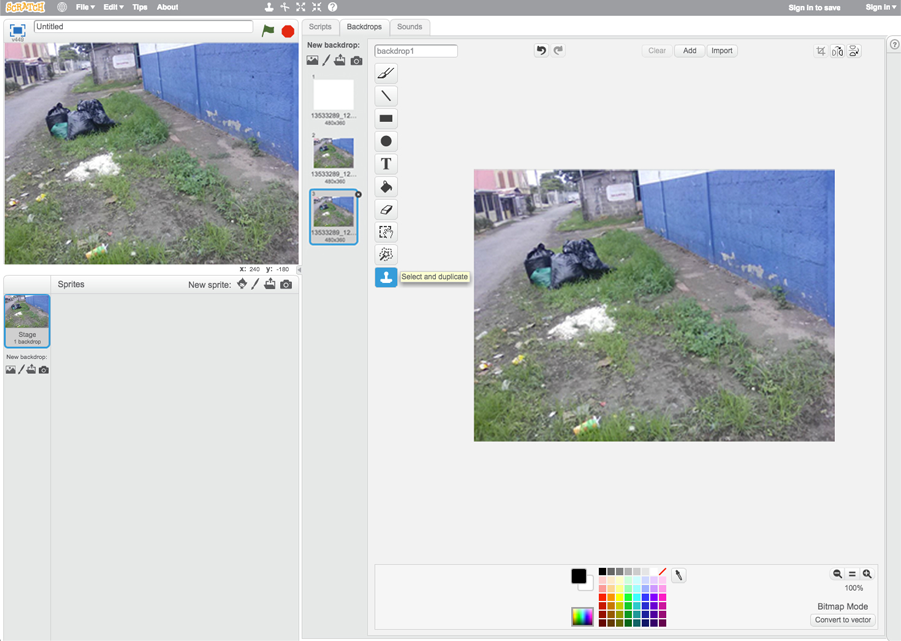
- Select the Backdrops tab.

- The thumbnail of the image will show up in the New backdrop section. Right-click and duplicate, that way you will be able to see the before (original image) and after (modified image).
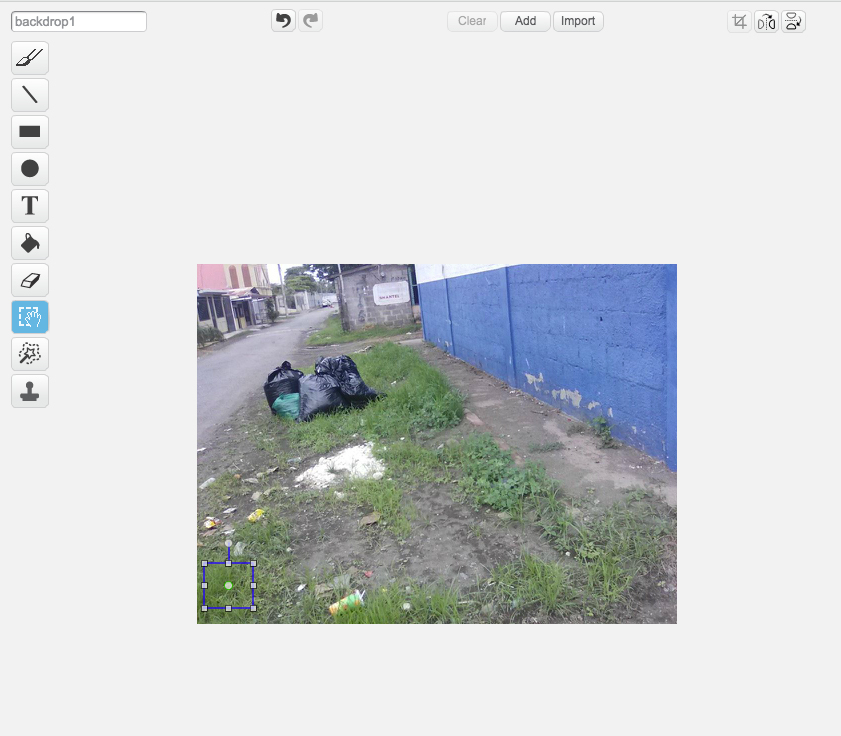
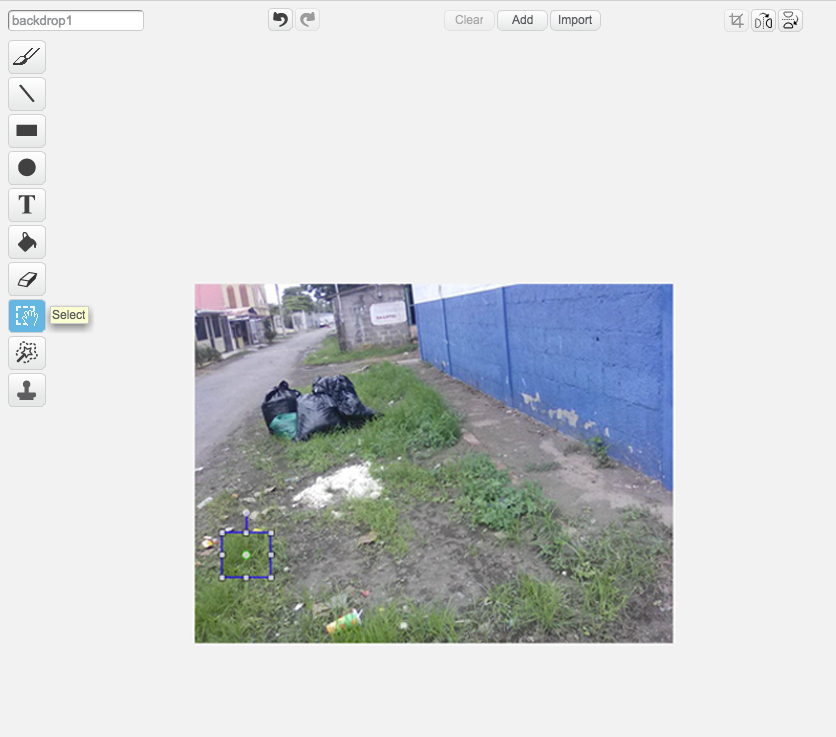
- Select the duplicate and in the toolbar choose the Clone icon (Select and duplicate) so you can reproduce elements of the picture.
- Make a square or rectangle enclosing an area that you can clone to cover the element that you want to remove.
- Drag it over the area that you want to remove.
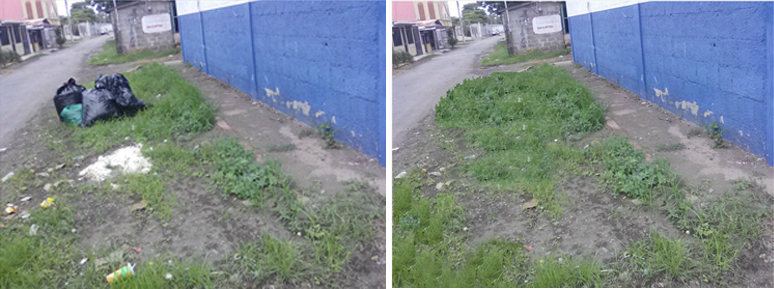
- Repeat the last three steps as many times as necessary. If you make a mistake, click on the Undo arrow. Here you can see the before and after:
Add elements to an image
- In the Sprites section select Upload sprite from file. Think ahead what you want to include, whether it's an image that you already have or something that you can use from the web. It's easier to merge it with the current image if it has a transparent background. You can also use an image from the Scratch gallery with the alternate button Choose sprite from library.
- The image that you upload will appear under Sprites. Make sure you are in the Costumes tab.
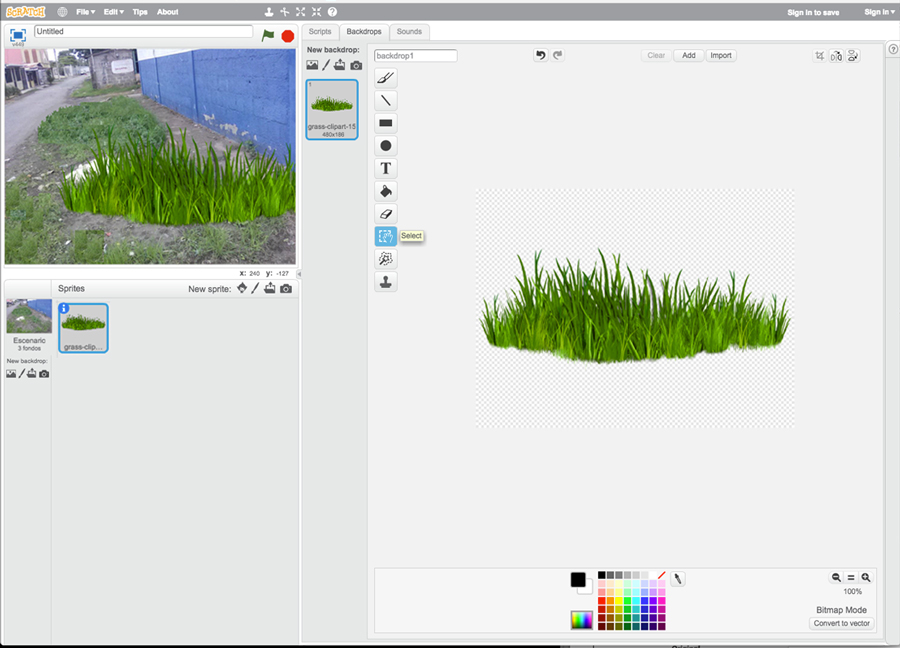
- In the left window you can move the object to the place where you want it. You can also change its size with the Grow and Shrink arrows at the top menu. In the window on the right you can modify the object with the drawing tools. The sprite can be duplicated as many times as necessary.
-
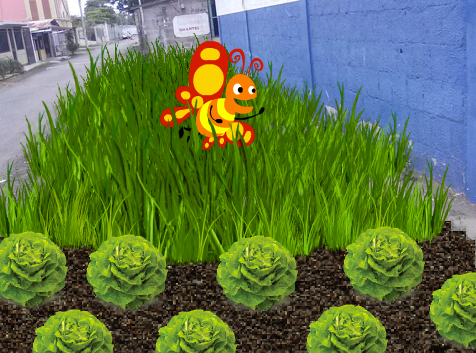
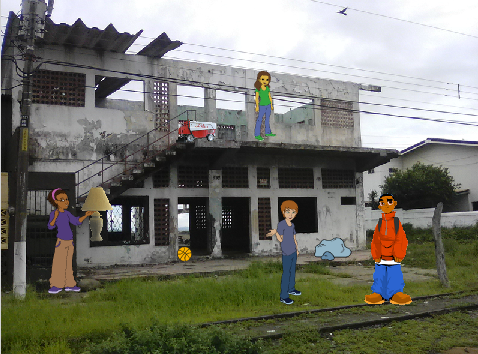
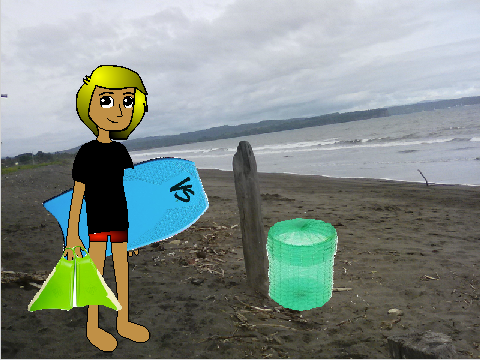
Examples made by PASSA youth
Example Before and after:

Example Add elements to an image:
Google Drive
It serves to create online documents that can be shared and modified by others from different devices simultaneously. It has tools to create presentations, text documents and spreadsheets. It also has a calendar that can be shared. You must have a Google account to use it. A single account can be created for the PASSA Group to be used as a repository of all the files, be it pictures, videos, illustrations or just about any other file. Visit their website.
 Activity 7
Problem box
Thinking about the future
"Think hard; those who merely work hard
generally lose their focus and intellectual energy"
Nassim Taleb
Annotation
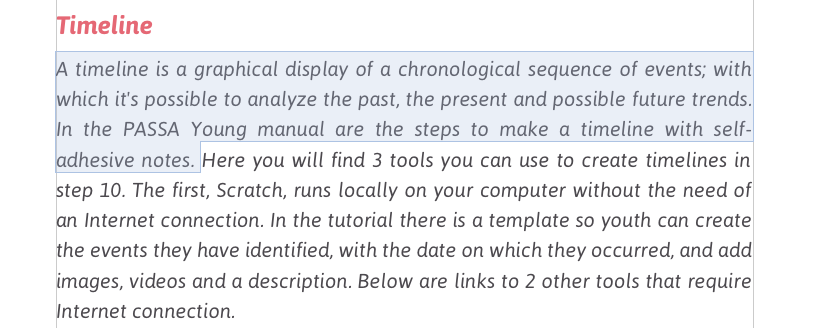
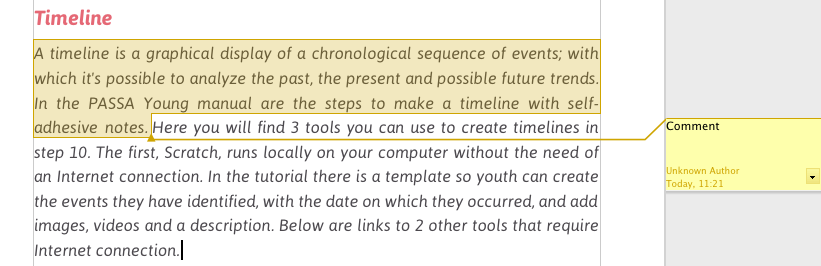
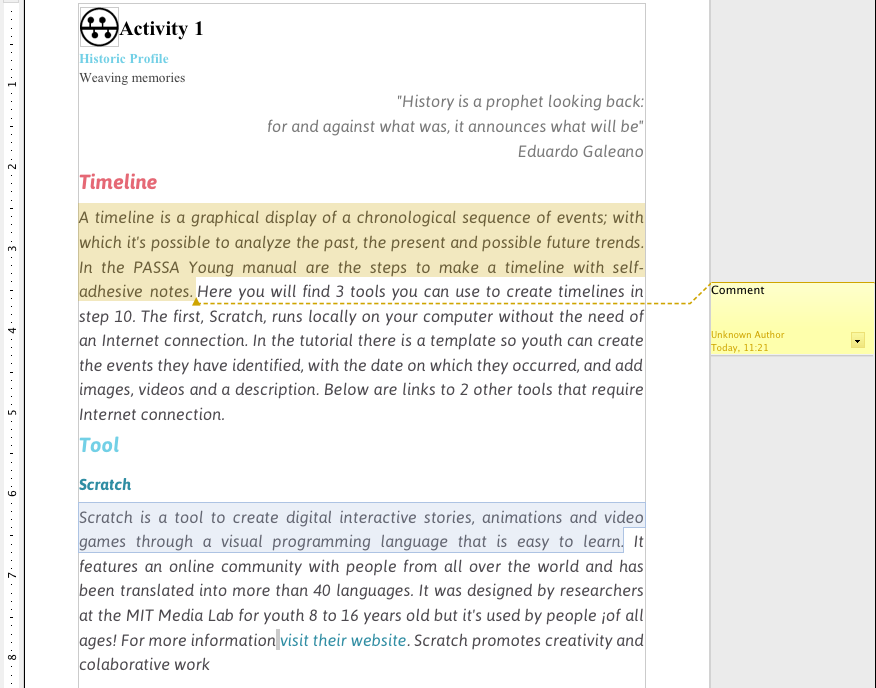
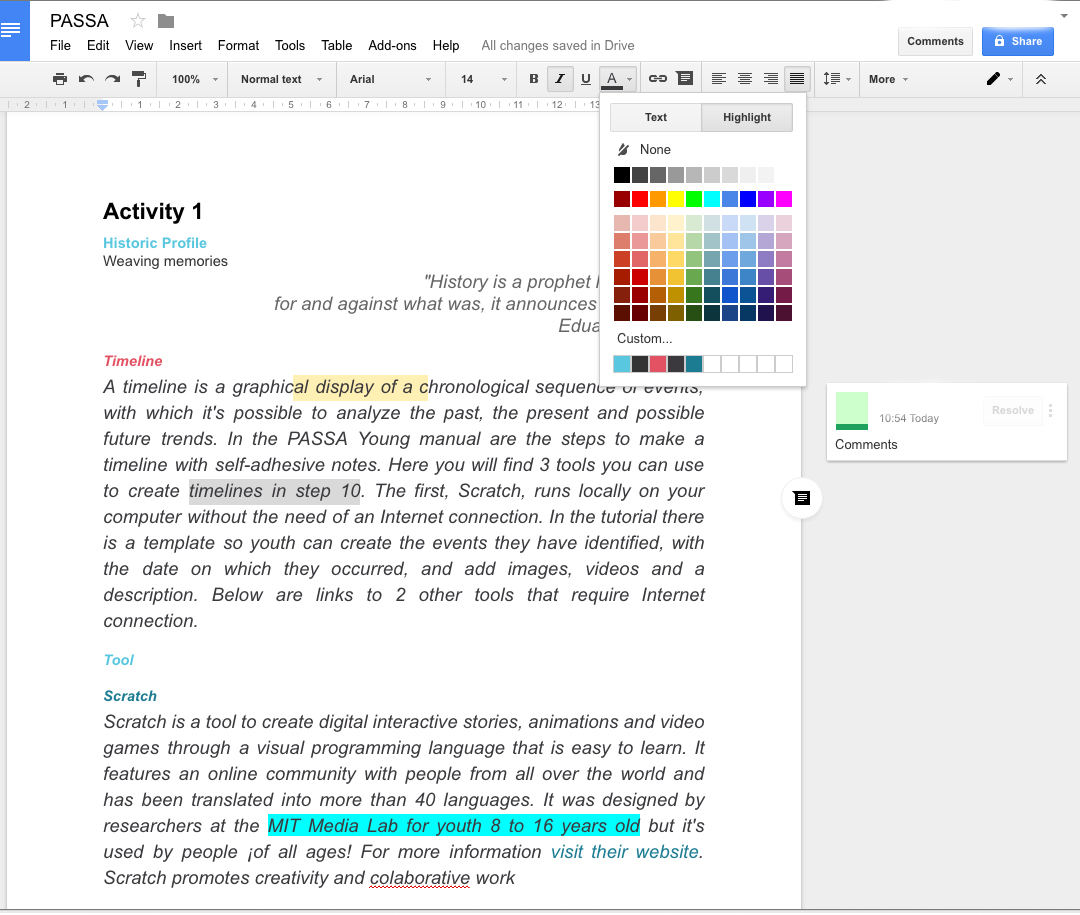
There are many ways to add remarks to digital data, fostering co-creation. Comments are text boxes outside the main text where document collaborators can provide explanations or communicate ideas. Another strategy to easily identify ideas or concepts is highlighting. Adding remarks to the action plan enables the community to quickly identify the main concerns and resolve difficulties that arise in the process.
Offline Tools
OpenOffice
Among the applications offered in OpenOffice there is a word processor, multimedia presentation software and a spreadsheet. All of them offer a variety of visual styles to improve the presentation and the analysis of documents. Visit their website.
Tutorial
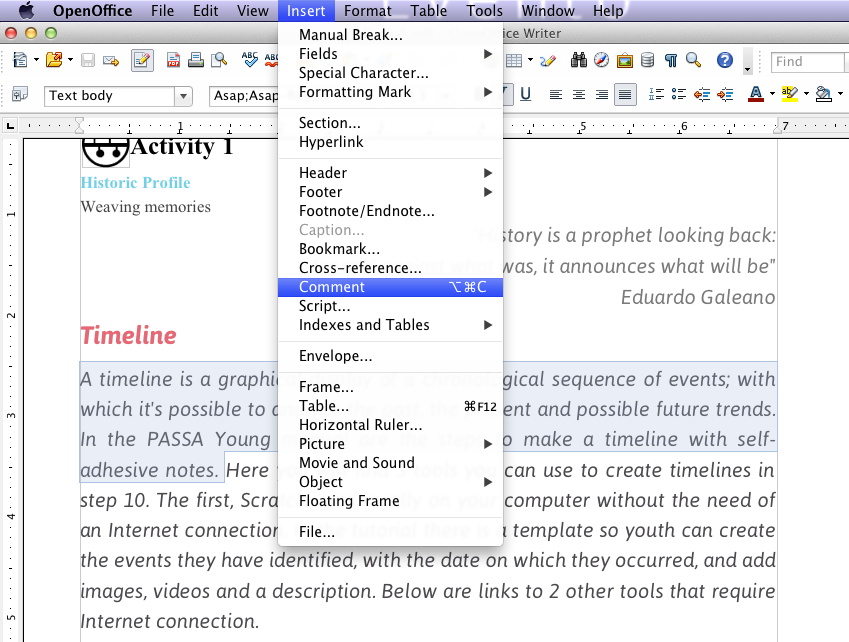
Adding comments
- Select the text you wish to comment on.
- From the Insert menu select Comment.
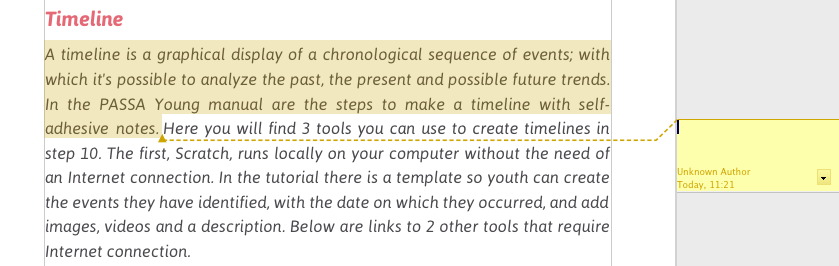
- A text box will appear in the right hand margin.
- Write your comment in the text box.
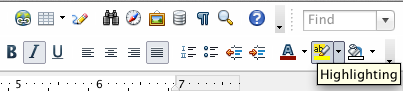
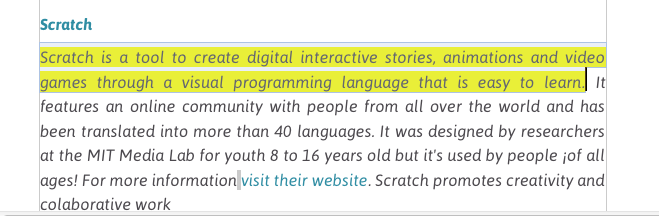
Highlighting
- Select the text you want to highlight.
- Click on the tool Highlighting.
- This highlights your selected text.
Save a file as a PDF
- Go to the File menu and select Export as PDF.
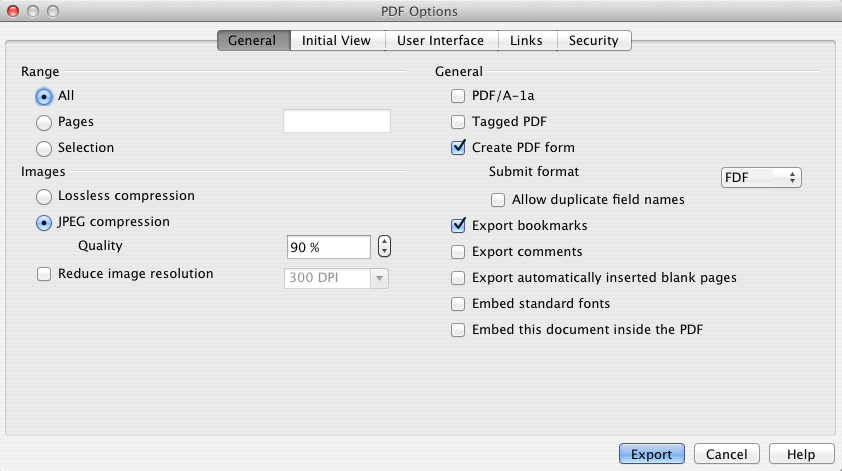
- The PDF Options windows opens. The default settings work well for most applications. However, you may change them to fit your specific needs.
- Click the Export button.
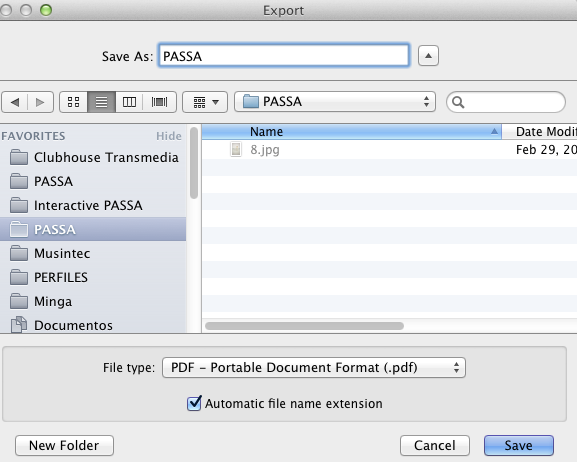
- Select the location to save your document.
- Rename the document if necesary.
- Click Save.
![]()
Adobe Acrobat Reader
It is an application for viewing PDF files. It's free and multilingual. The PDF format is used to share documents that can be opened on different operating systems without modifying their appearance. It has additional features such as comments, notes and text underlining. For information on these functions consult the online help.
Google Docs
It offers several free online applications like a word processor, a spreadsheet and a multimedia presentations builder. You can access these applications with a Google account.
Google Docs has the advantage of being able to create shared documents where collaborators can make changes from different devices simultaneously. It also has a built-in chat where they can share ideas in real time. To register an account with Gmail and gain access to Google Docs, visit their website.
 Activity 8
Monitoring plan
Making decisions
“We have already taken many steps, now it is time to take a leap”
Malala Yousafzai
Project management
The action plan will involve one or more projects that need to be monitored according to the parameters set by the group. Tools like spreadsheets and planning boards can help keep track of progress in a collaborative environment that any one can check and update. Social networks facilitate the group to maintain the connections established, get the word out, gather support and show achievements in the safety of shelters and settlements.
Offline Tools
Apache OpenOffice Calc
It is an application based on spreadsheets where alphanumeric data can be tabulated. Generally, spreadsheets are used to perform calculations, but can also be used to organize, compare and save personal or company information. Visit their website.
![]()
For this exercise download the Monitoring Plan template. This spreadsheet has six columns.
- Goal: drawings of a "safe future" chosen by the group during the Planing for Change excercise. (i.e. safe houses).
- How many: (i.e. number of houses to be improved).
- Indicator: what should be measured (i.e. the number of houses that were improved). Guide the selection of indicators so they are easy to measure and provide information that shows whether the plan is advancing.
- How to measure: how to review the progress achieved (i.e. ) how to measure the amount of improved houses (talking with homeowners, home visits, etc.).
- Frecuency: how often should the indicator be measured (every week, every month, etc.).
- Who will measure: who will be responsible for measuring the progress (i.e. who will count the houses and keep track to inform the PASSA Group).
Tutorial
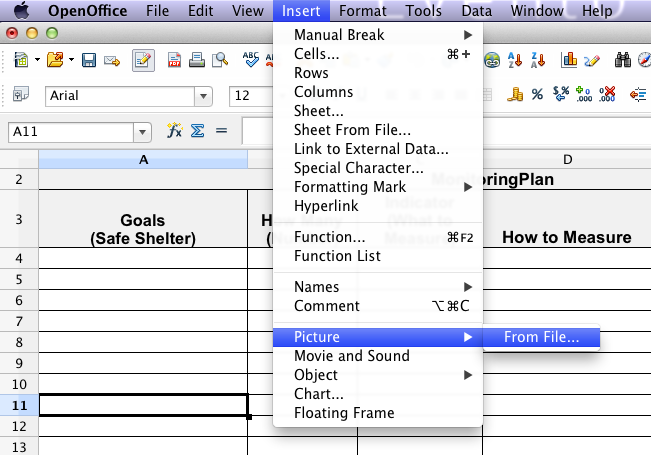
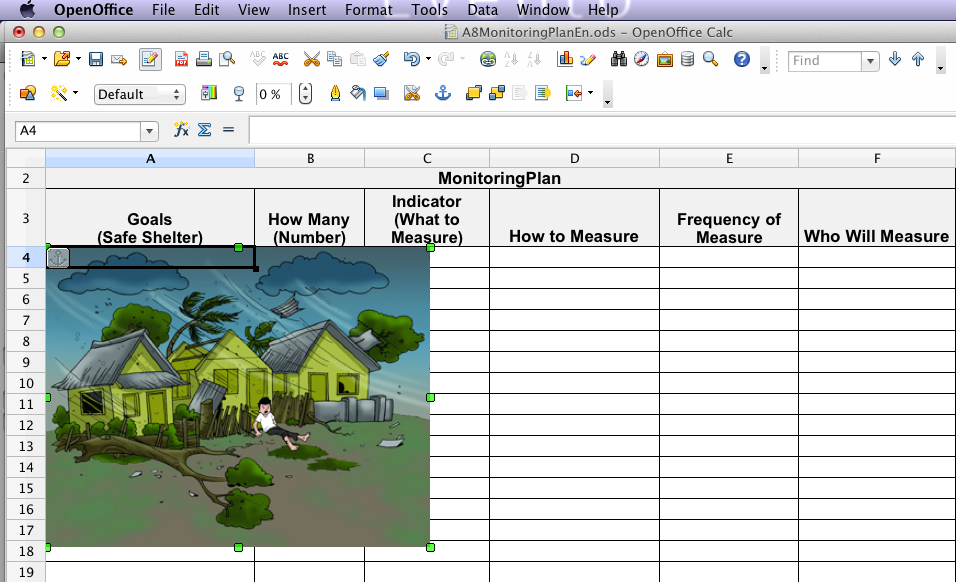
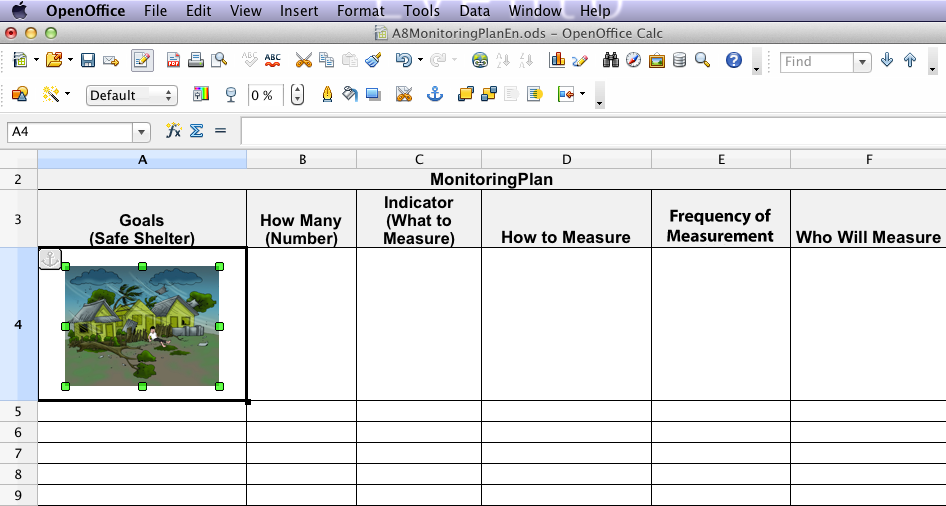
Insert images:
- Go to the Insert menu and hover the mouse over Picture.
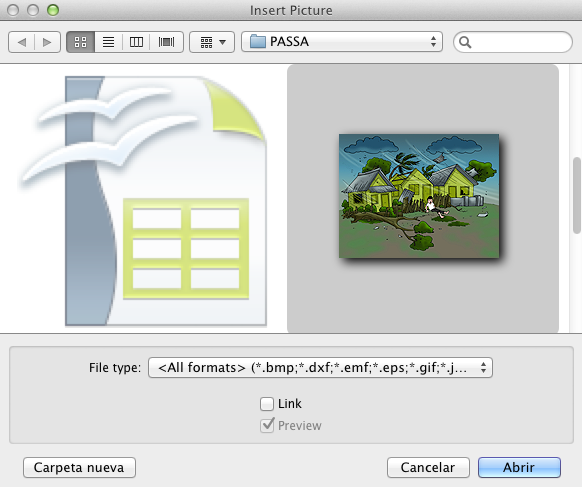
- Select From File.
- Choose the image you want to insert to the spreadsheet and click Open.
- Change the size of the image by clicking and draging from one of the green corners of the frame.
- Change the row size and place the image in the corresponding cell.
Online Tools
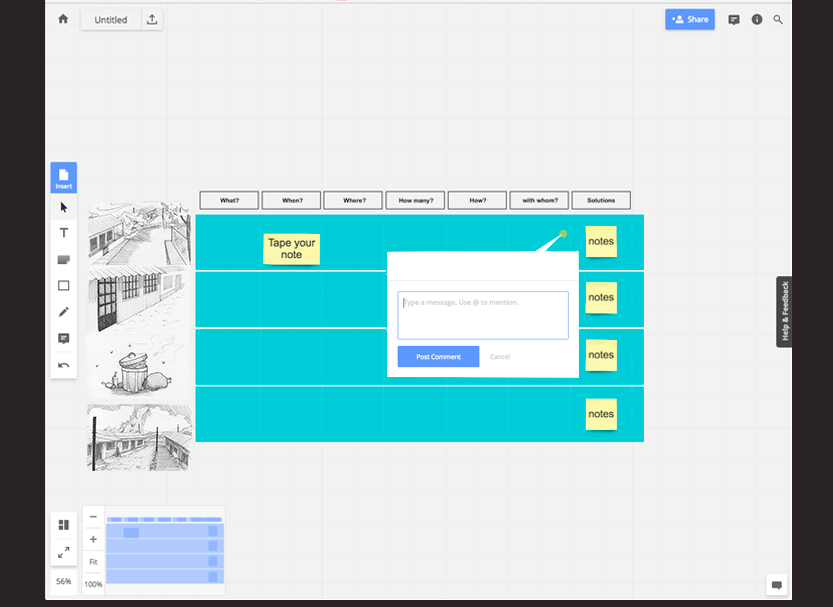
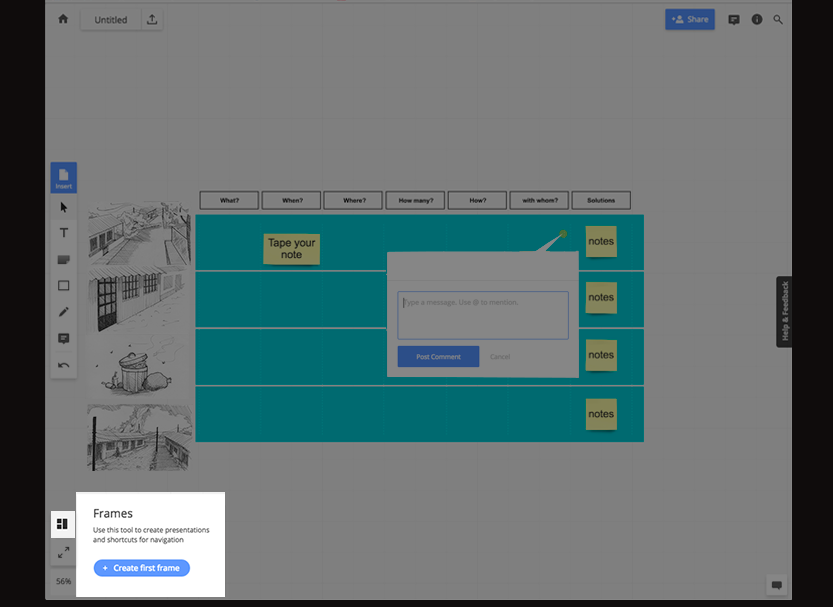
RealtimeBoard
RealtimeBoard is an online whiteboard created as a collaboration and brainstorming tool for agile teams. There is a free version with limited functionality and a Premium version that non-profit educational organizations can get for free for up to thirty participants. You can connect to this application from your Gmail account.
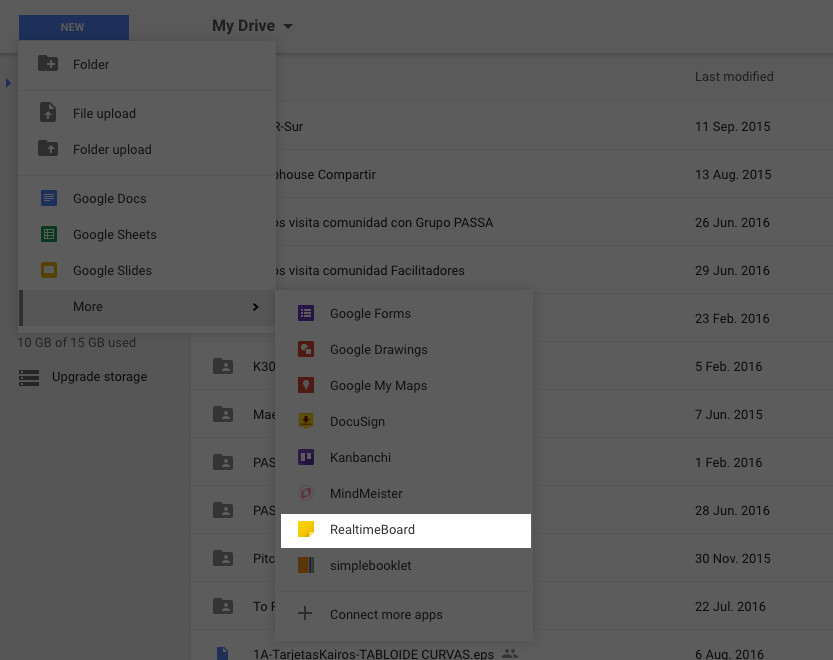
- Go to your Drive with your Google account.
- Select New and RealtimeBoard or if you dont have it, select Connect more apps and download it.
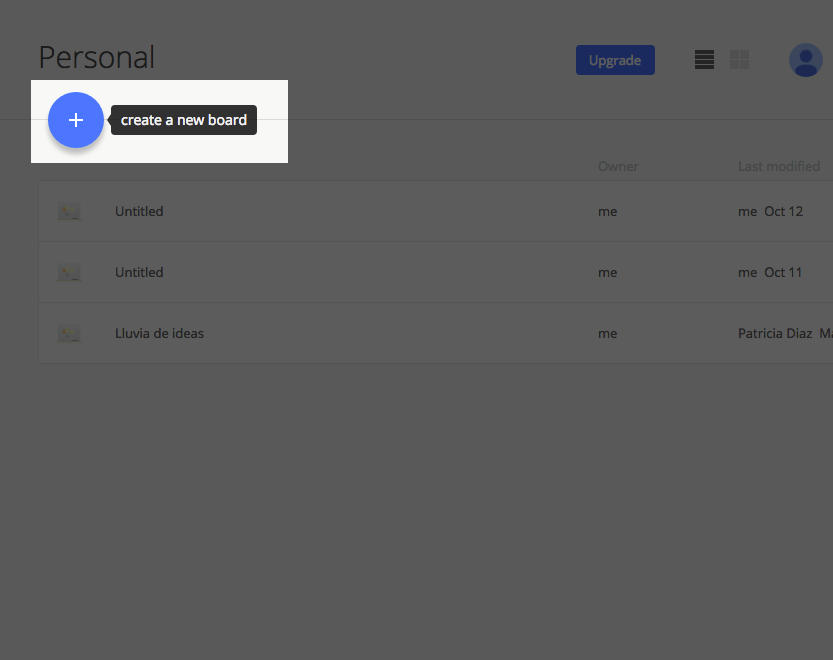
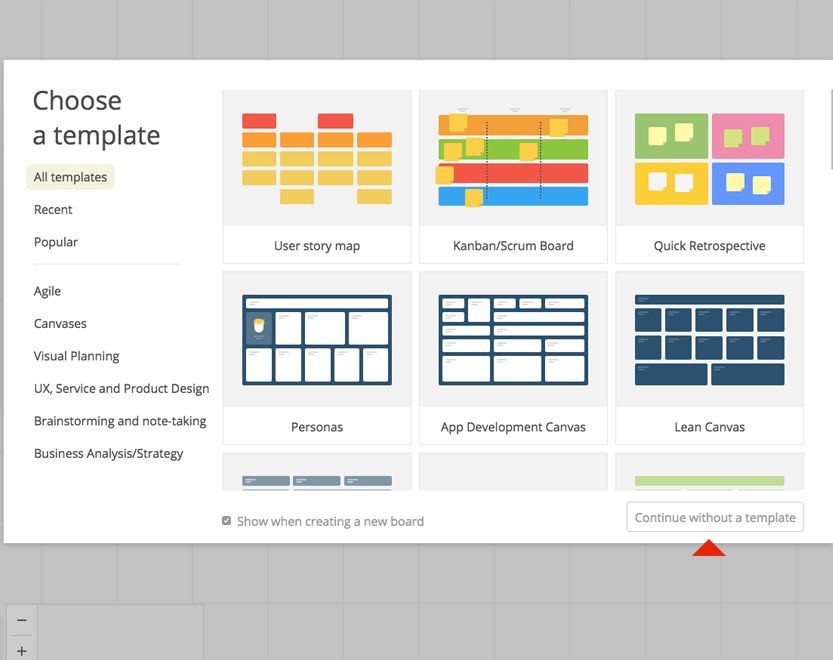
- Select Create a new board.
- You can choose a template or Continue without a template and create your own.
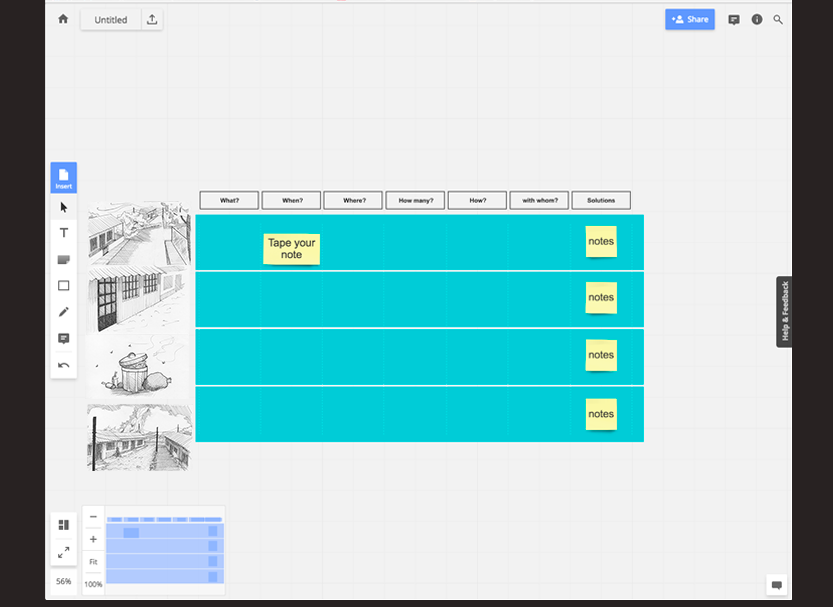
- We recommend you create a scheme like the next one for this activity.
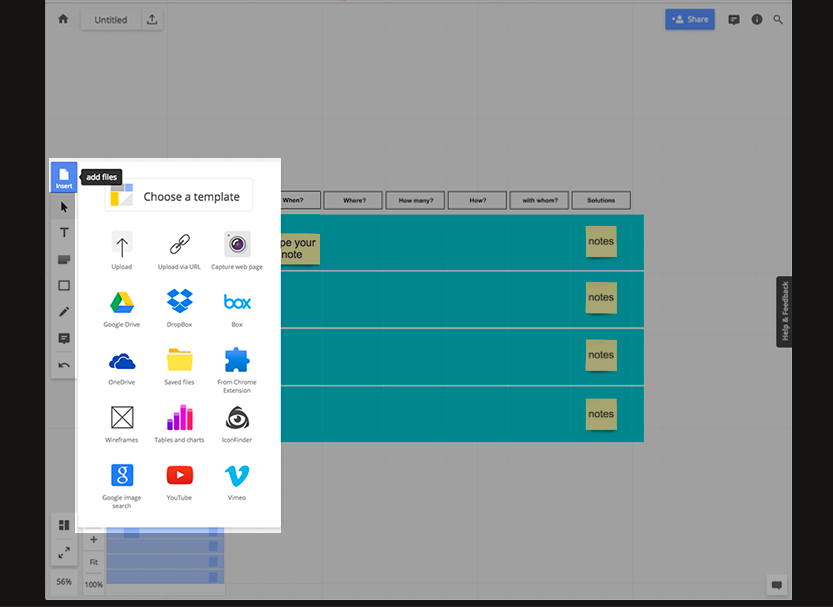
- Your team can add several kind of files like images, videos, links to documents, etc.
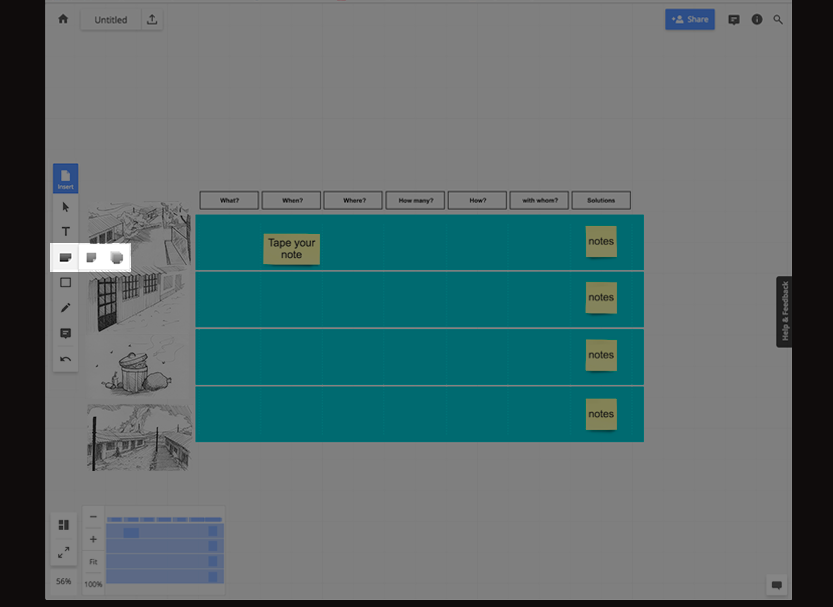
- Your team can also add post-it notes
- Your team can also comment the scheme and interact with your partners.
- When you finish your board you can make it look like a presentation by adding frames.
Social Networks

It is necessary that PASSA Group continues the process by itself. To facilitate this we recommend to create an account in a social network so the group can communicate and share information. Here some links:
Resources
Transmedia Toolkit
Download the full Transmedia Toolkit or the individual materials in the following section.
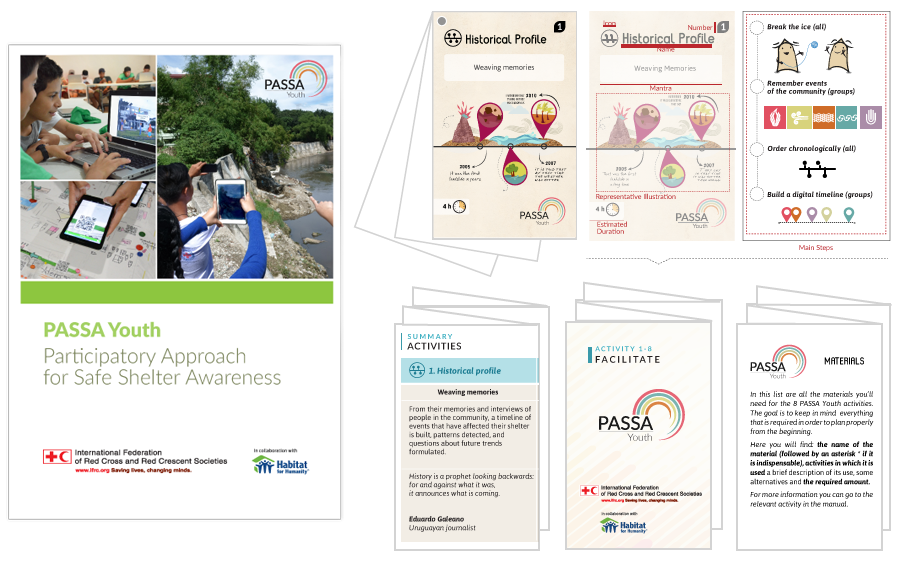
PASSA Youth Manual
The PASSA Youth Manual is available as a digital interactive version.
Activities Cards
There is a card per each activity, with key information on the front and the main steps on the back, that serves as a quick reminder during the implementation of the activity after you have a good understanding of PASSA Youth.
Summary of activities
Additionally, there is a pamphlet with the Summary of Activities that has the names, icons, mantras, descriptions and quotes of each activity where it is easy to see how activities interweave.
Facilitate guide
The Facilitate pamphlet has guidelines to keep in mind, as you implement PASSA Youth, with specific recommendations for the presentation, interaction, documentation and closing during the activities.
Materials
While in the manual each activity has the materials needed for its implementation, the Materials pamphlet has the combined amounts of materials required for the development of all of the PASSA Youth activities.
Template to estimate times
It is important to estimate the specific times for each step during planning and to give clear instructions during facilitation. Use this Template to estimate times; fill and adjust according to the context.
Videos
Tools
Scratch
Requirements
Install Adobe Air for Scratch to work on your computer.
Downloads
Download the Scratch software for the operating system on your computer and install it.
Google Earth
Requirements
Operating systems
- Windows XP, Windows Vista o Windows 7
- Mac OS X 10.6.0 or newer versions
- Standard base para Linux - LSB Libraries 4.0
![]()
Downloads
Apache OpenOffice
![]()
Downloads
Download the Apache OpenOffice software for the operating system on your computer and the language of your choice.
Krita
Downloads
Training
The aspiration of the Federation is to reach 10,000 youth in 70 cities in 10 countries between 2017 and 2020. To this end, it has put in place the present training structure and made available materials for trainers.